Your site design is final-for-now and you’re all set to go! How do you proceed?
Table of Contents
Move Site to Real Domain
If you’ve been working on your website someplace other than where you ultimately want it, you’ll need to move it.
WARNING: If you have an existing website, following these instructions will overwrite its contents. Back up the old site before you begin. If the old site is also a WordPress site with a blog, use the Tools > Export screen to export your posts from the old site. After you set up the new site, re-import them, so all your old blog posts are still online.
Some hosting providers have a “staging site” function built in to their server, where you can work on the new version of a site while the old version is still up. If you’re using that capability, there should be a function to make the staging site live, overwriting the old site.
Some hosting providers also have a tool for migrating a site from wherever to your hosted domain.
Assuming neither of these is an option, one way to move a WordPress site from one domain (or subdomain) to another, is the All-in-One WP Migration plugin by Yani Iliev et al. There’s a nice instructional video on the plugin page, so I won’t describe in detail how to use it. The basic process is:
- Create a new WordPress installation in the new domain, if there isn’t already one. For simplicity, use the same WordPress username and password as your sandbox.
- Add the All-in-One WP Migration plugin both there and on your staging site.
- Export from the staging site to a single large file, which you download.
- Import the downloaded file to the new site.
- Re-login to the new site.
- Go to the Settings > Permalinks page and click Save twice.
The main problem you’d usually experience with migration is the change in the base URL of the site. In your staging site, the URLs were maybe of the form, “http://sandbox.something.com/…” and on the real website they’ll be “http://yourname.com/….” If you just copied over the files and other data to the new site, all the links would still point to the test site. But all of the methods mentioned above switch over all the URLs automatically. It’s brilliant.
Just to make sure, use the website search in the new site to find all occurrences of “sandbox” (or whatever subdomain name you used). If any remain, correct them manually.
Once you’re satisfied that everything copied over successfully, delete the WordPress site from the staging subdomain (from the WordPress section of Site Tools), then delete the subdomain (from the Subdomains screen in Site Tools, which might be under Domains). It’s a bad idea to let old staging sites hang around getting out of date; hackers might break into them.
Enable Periodic Backups
It’s important to have offsite backups of your site. This protects you in case your hosting provider shuts down your site or you are locked out by hackers.
Earlier we installed UpdraftPlus backup system. Go to the Settings > UpdraftPlus Backups screen and on the Settings tab, configure automatic backups to the storage system of your choice. Using Google Drive for this is free, and most people’s unused Google Drive space is more than sufficient.
Note: backup to Google Drive may initially fail, because Google sometimes needs a little time to get used to the idea. Wait a few hours and it will start working. Do not create your own API key.
If you instead configure automatic backup to send you the backup files by email, make sure your mail quota is large enough to accommodate those files. To find out the size, use the “Backup now” button to create a backup locally. When you receive a backup by email, you’ll want to save the attachment to disk and delete it from mail, so you have a local copy and aren’t using up your mail quota.
If you put large files in your media library – videos and such – these will be included in your backups by default. If you already have a place where you’re backing up large media files, it might be a good idea to exempt them from backup. This will make the backups run faster, and save space in your mailbox or other backup location.
Auto-share Posts
When you write a blog post, you may want to let people know about it via social media. I say “may” because this may not be appropriate in all cases, depending how much you blog and how much of it is interesting content as opposed to ads for your books. It’s possible to set things up so every post you publish (including those published on a schedule) is announced through your social media accounts.
I’ve waited until now to tell you how to do this, so that your test posts don’t mystify your friends and followers.
I recommend the OnlyWire service. This supports auto-share to many social media platforms, including Facebook and Twitter. To have more control over what text and hashtags appears with the share, use Blog2Social, which has a free version that’s manual, and a paid version you can schedule to post automatically.
Note: On Facebook you can auto-post to groups and pages, but not to your personal timeline. No plugin can provide that ability because Facebook doesn’t allow it. There are tools that claim to work around this limitation, but don’t try it because it’s a good way to get banned from Facebook.
To set up OnlyWire, go to their website, onlywire.com. Create an account. You have the option to login using your Facebook account, but don’t. The WordPress setup works better if you just have a plain username and password on their site. (Plus, Facebook wants to shove their nose into everyone’s business and I don’t want to let them).
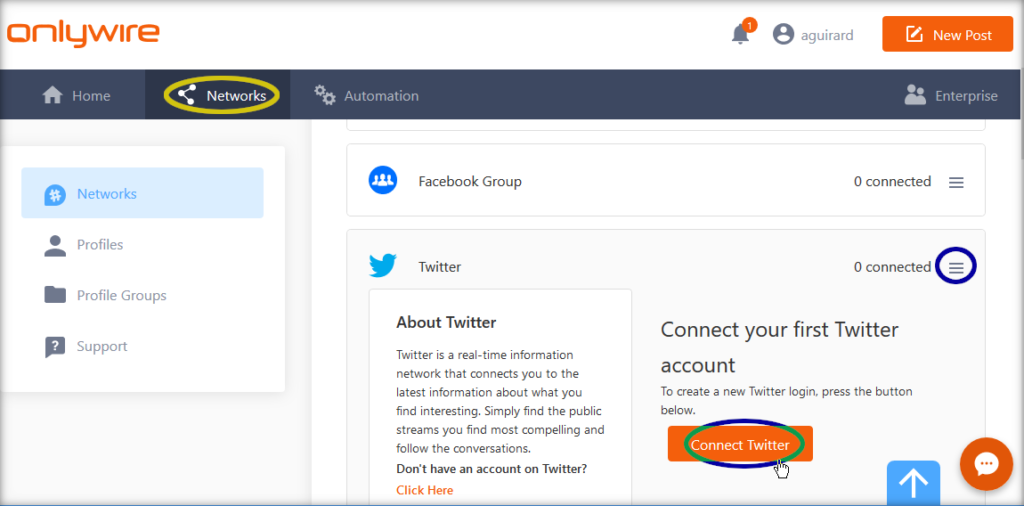
If you want to take the site tour they offer, go ahead. When you’re ready to proceed with setup, go to their Networks screen.

For each social media platform you plan to publish to, click the hamburger menu icon on the right, use the Connect button in that section, and tell the target platform that OnlyWire is authorized. There are separate entries for Facebook pages and Facebook groups, but (as mentioned above) no way to post to a personal profile.
Once done, OnlyWire can post to your social media platforms, but it doesn’t know about your website, so it doesn’t know what to post.
Next, go to your site and install and activate their plugin, OnlyWire for WordPress [OFFICIAL] by OnlyWire Engineering. On your dashboard, go to Settings > OnlyWire Settings, and enter your OnlyWire username and password. Click Save Changes.
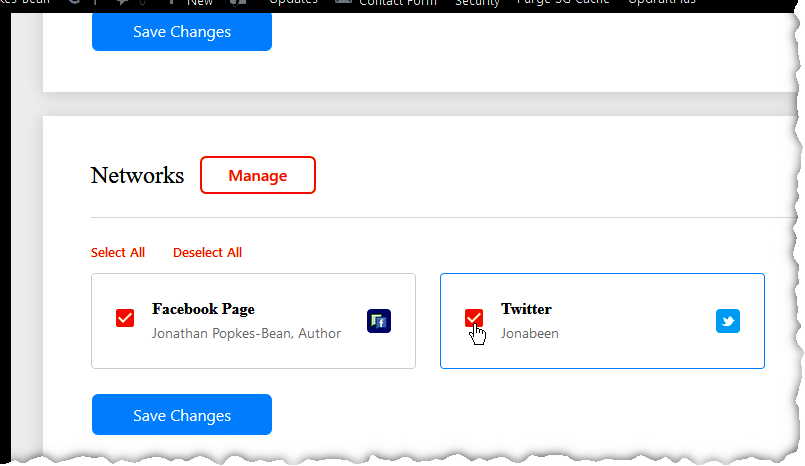
Scroll down a little, and find a list of the social media accounts you enabled on the OnlyWire website. Select which ones you want to auto-share to.

Save Changes, and you’re done – every new post from now on gets shared to your social media.
The social media posts are shown as coming from OnlyWire instead of looking exactly the way posts you made manually would, as you might prefer. However, from reading reviews and trying some other options out for myself, this is the best you can do that’s both free and fully automatic.
Again, please don’t try to get around Facebook’s prohibition on automated posts to your personal timeline. It’s not worth the hassle. Either have an author page, or do those shares manually.
If you want more control over how your posts appear on social media, you can do some of that with Yoast SEO as you write the post.
Another tool I like is the plugin Blog2Social, which has an automatic/scheduled option in their paid version. The free version lets you register several different services to post to, control for each service exactly what will be posted, and manually initiate sharing. So you can’t use the free version to post at 5 AM while you’re asleep, but it does save labor.
Announce the Heck Out of It
It’s time to let the world know about your new site! Even if you have an old site, the redesign is an excuse to make an announcement on all your social media sites, and write to friends to ask them to help spread the word.
Include graphics! Use the Featured Image capability, which many social media sites look at to determine what image to display when someone links to your posts. The Yoast SEO plugin also lets you control this.
If you’re posting to Facebook, you can make a private post first to see how it’s going to look. Note: if you change the page you linked to, Facebook might not notice the change right away and adjust its display of your link. Use the Facebook Developers page (https://developers.facebook.com/tools/debug/og/object/) to tell Facebook to “scrape” again after you update the page.