It’s time to provide content for the website, including information about you and your books. You’ll choose a theme, color scheme, and graphics to reflect your preferences and the type of writing you do.
Some of the controls covered in this chapter, my setup program has already set to values you’ll probably be okay with. I’ll show where to find them in case you want to change things down the road.
Table of Contents
The Customize Screen
- Use the “home” icon on the dashboard’s toolbar to visit your site and look around.
The illustration below shows the site formatted by the “Twenty Nineteen” theme, which was the default of my hosting provider at the time. Your results may vary.
- Look for the dark toolbar on top (if it’s not there refresh the page). Click “Customize” on the toolbar.
Note: some themes now use a newer method of customizing the site, the “Edit Site” control. This lets you edit the layout of your site as if it were a page, similar to SquareSpace and other site builders. Twenty Twenty Two theme is an example of this. Site editing is new and experimental, so I recommend using a theme that uses the older Customize technique — for now.

The Customize screen doesn’t have a toolbar. Instead there’s a menu on the left, and blue-pencil icons you can click to edit different parts of the screen.
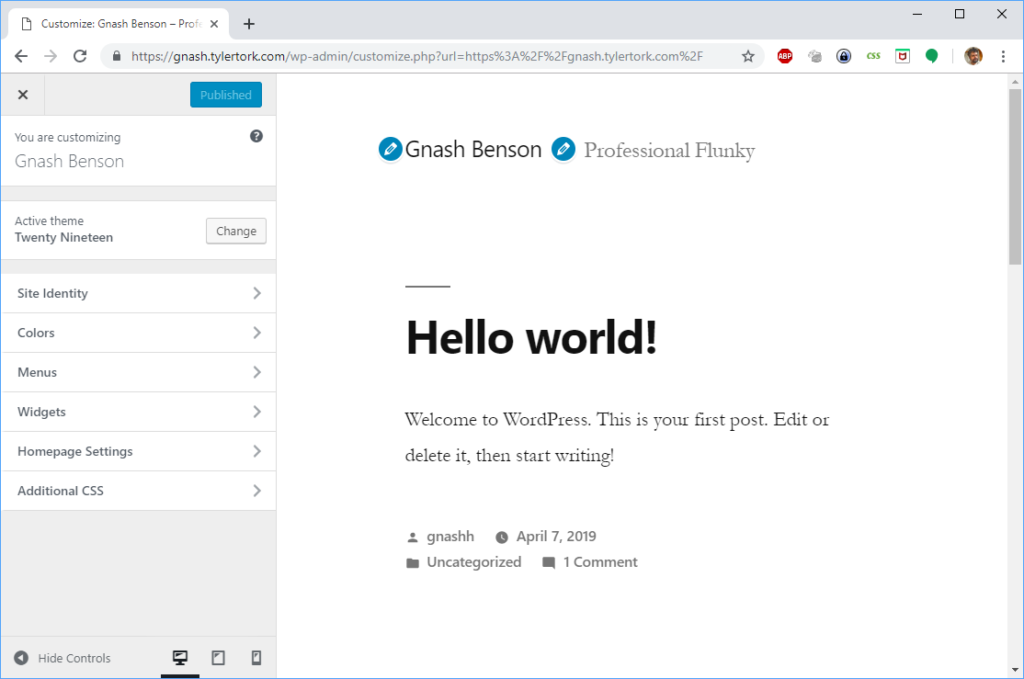
This is the easiest way to adjust the look of your site. Customize can preview your changes before saving.
A decent theme will have most if not all settings available in Customize, but some might be only on the dashboard, or in both places.
The controls on the left let you change settings. The results of your changes are immediately visible on the right. You can make several tentative changes, then use Publish to save them all at once, or the X at the top left to cancel them.

The “<” symbol near the top left navigates up a level in the Customize menu.
Change Your Theme to Twenty Sixteen (Temporarily)
A theme controls the overall appearance of your site. There’s always at least one theme on your website; it can’t work otherwise.
We’ll change your active theme to match the one I use in my later examples — “Twenty Sixteen.” It’s plain-looking, without built-in graphics, which is why it’s good for examples. You’ll switch to a different theme of your choice later.
- In the Customize screen, at the top level of the menu, find the “Active theme” setting, and click the “Change” button.
WordPress is generally installed with a few themes already loaded, including one or two recent year-numbered themes like “Twenty Twenty-One”. It’s possible, though unlikely, that Twenty Sixteen is already loaded on your server.
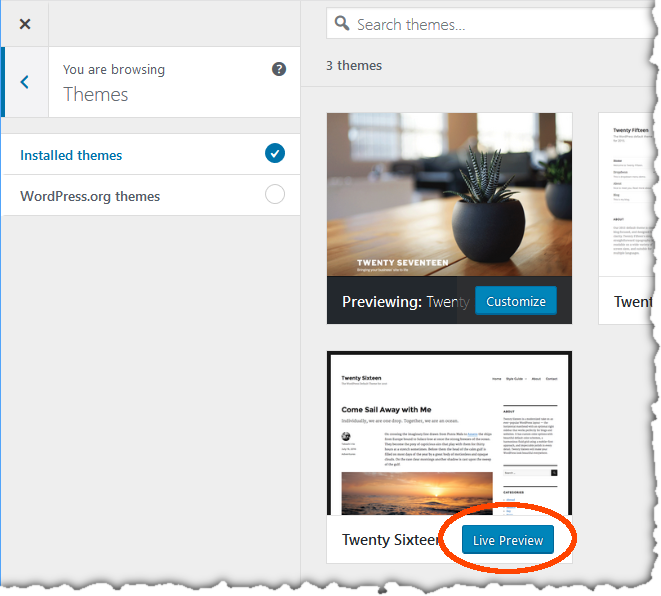
- If “Twenty Sixteen” is listed, click its “Live Preview” button. If it isn’t listed, select “WordPress.org themes” on the left, search for Twenty Sixteen, and click its “Install & Preview” button.
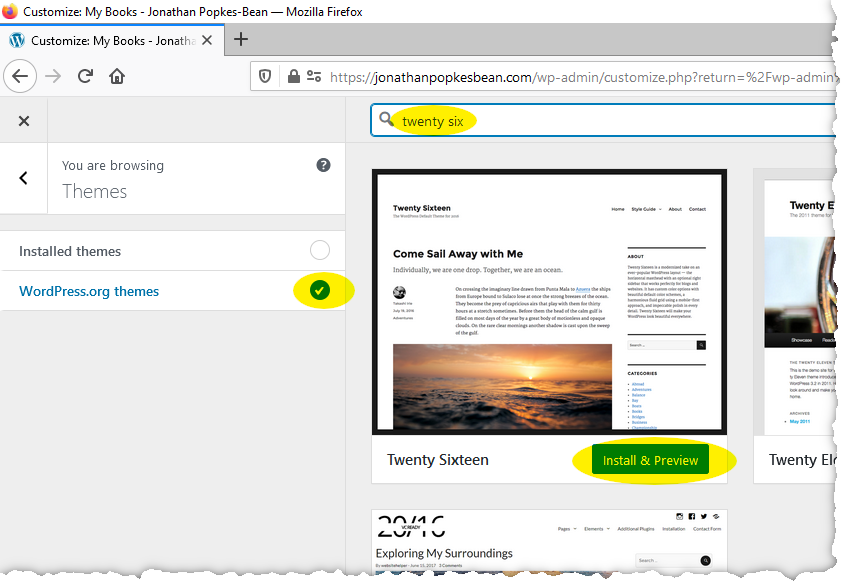
In either case, your screen changes to show what your website will look like with the new theme.
Observe the difference. The screen has been reorganized, the fonts have changed. There might previously have been some “widgets” at the bottom of the page, which now appear on the right. There’s a black border around the page.
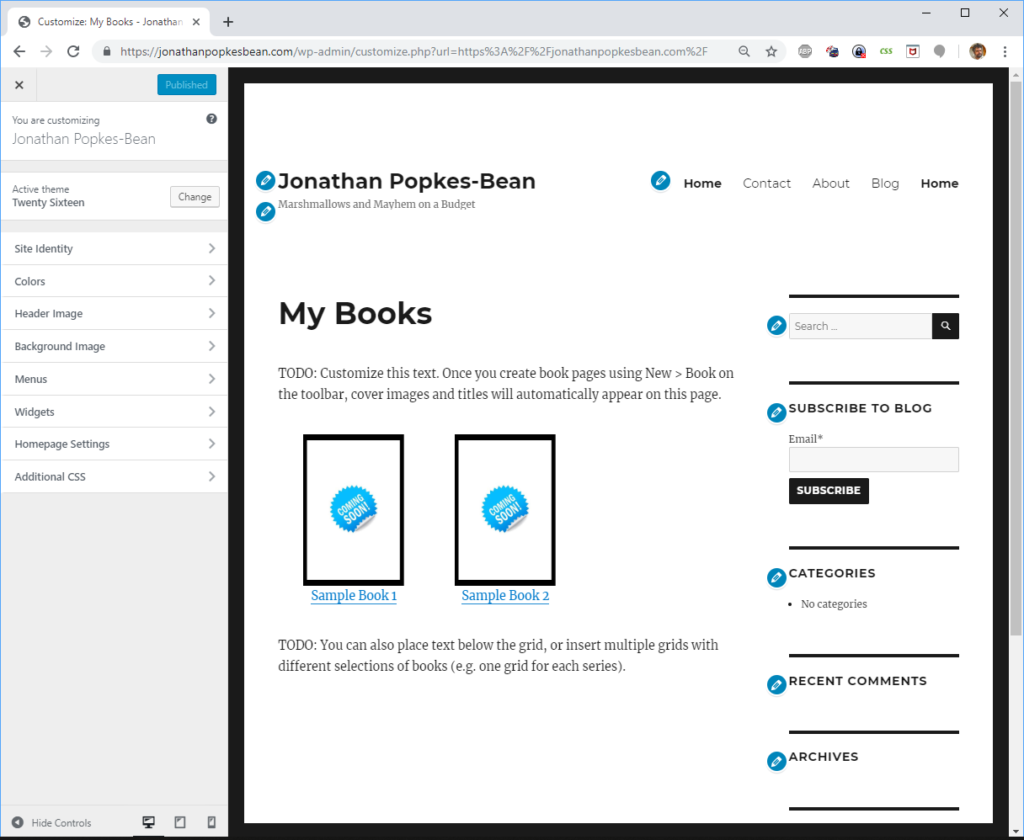
- Click the “Activate & Publish” button at the top of the Customize menu to accept this change.
- Click the X at the top left to exit Customize mode.
Responsiveness Testing
Most themes are responsive, adapting their appearance for large screens, tablets, and mobile devices. They usually do this based on the width of the screen (and not, for instance, by noticing you’re on an iPhone).
Responsiveness is important. Many, perhaps most, of your visitors will view your site on their phones (in the case of my websites, about 50 percent). Unless you own a banjo, it’s hard to be more annoying than a website with tiny text you have to scroll in both directions.
Generally, as the window gets narrower, some things shrink, the menu collapses to a button, sidebars drop below the page contents, and so on, to make best use of the available screen “real estate”.
Different themes adjust differently, and allow different amounts of control over that adjustment. For instance, some let you specify certain items will be visible only on large screens, or only on small screens.
There are two ways to preview how your site will look on various devices.
First, for a quick but imprecise peek, the Customize menu has controls at the bottom of the left pane corresponding to a computer screen, tablet, and phone. The illustration below shows the phone preview.
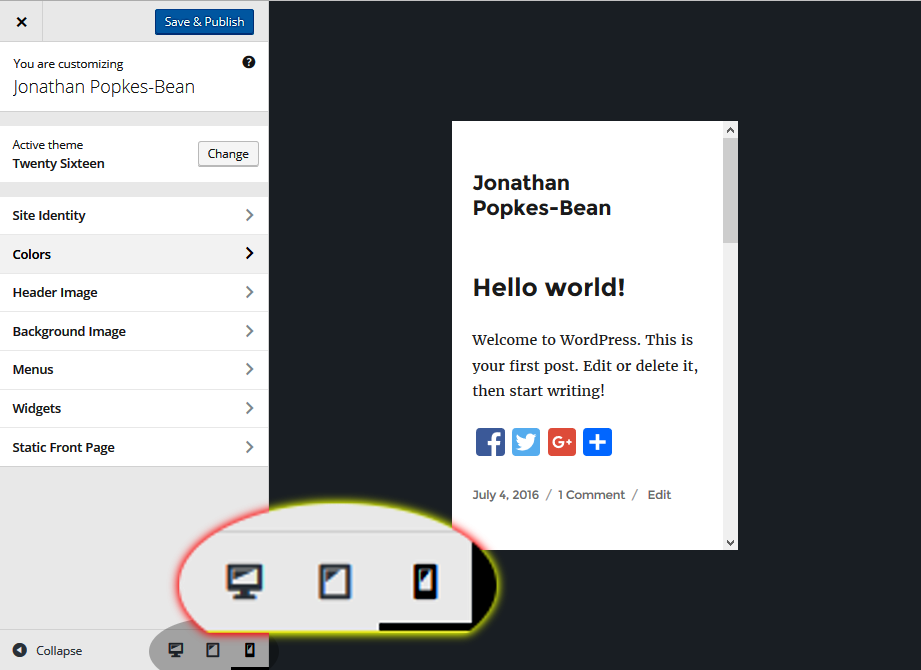
Note: The “collapse” control at the bottom left gives you more space to see the full screen. I always forget I can do that.
The more exact technique uses your browser’s “developer tools” to simulate the appearance on specific devices. Don’t do this while in Customize, but from regular web-browsing mode. On most browsers, you can access the simulator with a menu such as Tools > Web Developer > Responsive Design Mode. This makes the browser pretend to be a specific type of phone or tablet, and shows exactly how the site looks on that device.
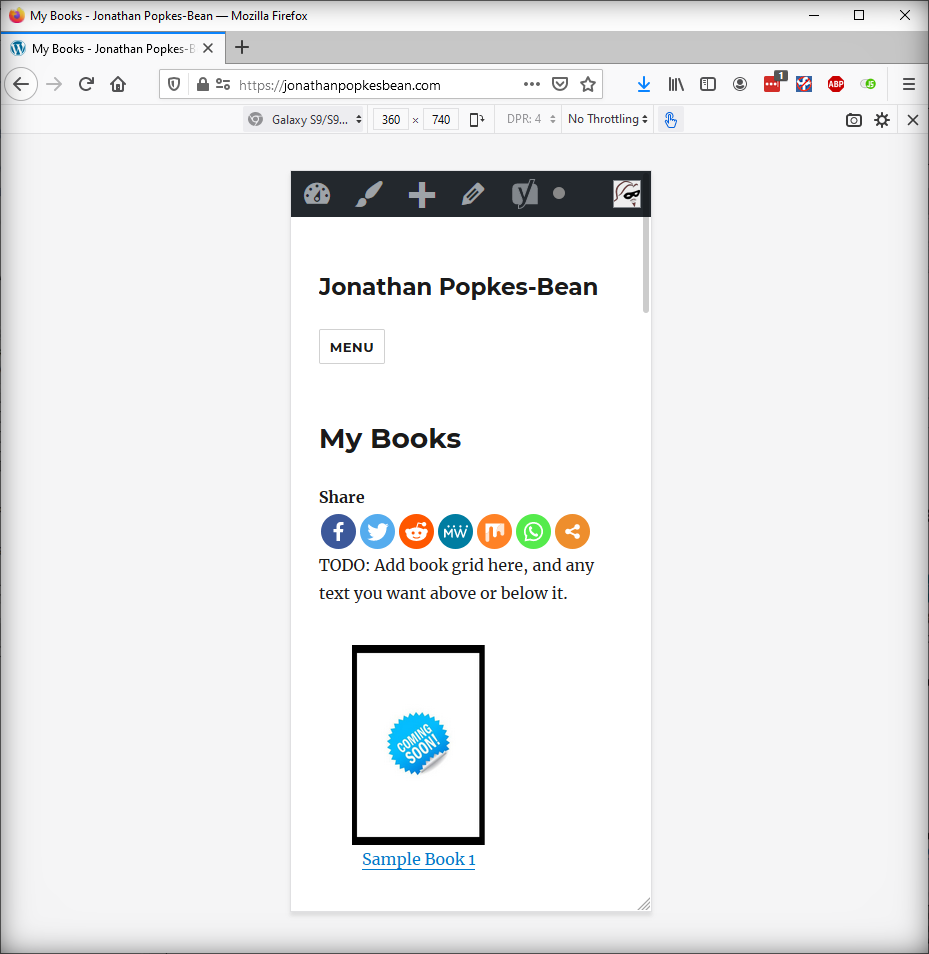
Since I’m still logged in, I see an abbreviated version of the usual dark toolbar. Above that, outside the “screen” area, another toolbar controls the type of device you want to simulate, or lets you arbitrarily enter a screen size, or “rotate” the device. The bottom right of the screen has a resize control to drag to whatever size you want, the contents adjusting continually as you do so. This lets you quickly try all possible screen widths, and if you have a problem, the toolbar shows the exact dimensions where the problem is occurring.
If you find a theme you like that’s not responsive, don’t use it. There are plugins to give phone users a reasonable vanilla experience of your site, but if the developers didn’t pay attention to something this basic, it’s just not going to be a good theme.
Featured Images
Each page or post optionally has a “featured image” that (hopefully) gets displayed alongside an excerpt of the text when the post is referenced elsewhere, such as in social media shares, in the list of posts on your blog page, and in web search results. It’s “featured” in the sense that if you have to choose one image to be representative of the post, this is the one to use.
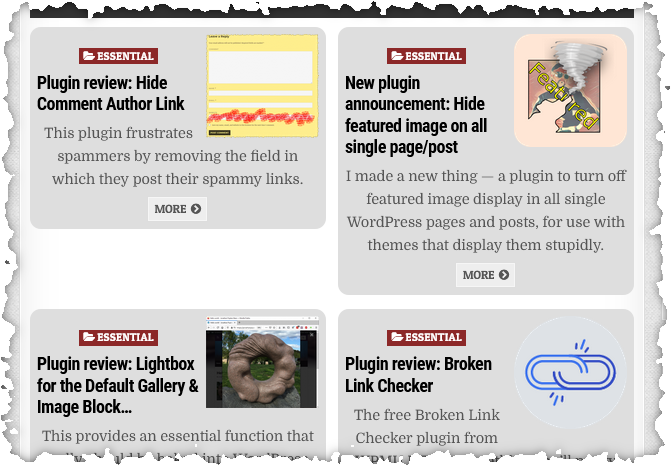
Normally, you’ll want the image to also appear within the post or page (otherwise why feature it?) but sometimes not, or sometimes the featured image is a cropped piece of a larger image from the post. However, many themes assume you always want to have the featured image at a standard spot on the page.
I’ve worked on many websites and found this helpful only once, on a site where every post was a meme followed by the transcription of the meme. For that site, it made sense to have the meme be the featured image and to have it display full size above the text on every page.
In general, if the theme I’m using doesn’t let me choose whether to display featured images on pages, I install a plugin that either hides the featured image on all pages and posts (Hide featured image on all single page/post by Tyler Tork), or lets me choose which individual pages should show it (Conditionally display featured image on singular pages and posts by Cyrill Bolliger).
- Visit your Styling Test page to see how Twenty Sixteen theme treats featured images. As you evaluate themes later, revisit this page.
Now that you’ve seen what Twenty Sixteen theme does with featured images, let’s change that behavior.
- Visit the Plugins screen of your dashboard and find the Hide featured image on all single page/post plugin, which is among the plugins the Torknado Author tool installs.
- Click “Activate” for that plugin.
- Visit the Styling Test page again to confirm the featured image is no longer displayed.
Now, when you create a post or page, you can add a featured image to show in shares and search results, and add the same image somewhere within the page at your desired size and location. There’s an example of this soon when we customize the About page.
When you try out a new theme, first deactivate Hide featured image… plugin to see whether you need it with that theme.
Blocks vs. Classic Editor
WordPress has two editors for page and post contents. The older “Classic” editor resembles a simple word processor. The new “Blocks” editor is a more like a webpage layout tool, letting you define “containers”, use responsive columns, create special items, and reposition these parts relative to each other by dragging. The Blocks editor has fully taken over for editing pages and posts, though you’ll still see the Classic editor in other situations.
For someone used to word processors, Blocks may seem more complicated than necessary. However, some things you need do when formatting a page are significantly easier with Blocks, especially as it relates to responsive content. There are also a lot of nice pre-built components that will save you time once you know they exist and how to use them.
If you tried using Blocks before and didn’t like it, please try again. It’s improved since it was introduced. There are several good tutorials online, and I suggest you try a couple to get the hang of it.
If you find you just can’t work with Blocks, it’s still possible to edit pages using the Classic editor by installing the Classic plugin on your site. Depending how you set its options, you can either disable blocks altogether or decide on a per page basis which editor to use.
There’s also a “Classic block” you can use without installing any plugins. This lets you have the word-processor experience within a block.
What Should I Put on My Site?
My informal survey of readers who visit author websites show they look for the following, in approximate order of frequency:
- The proper order of your series.
- All books in chronological order irrespective of series.
- Photos and bio.
- How to get in touch with you or your representative.
- Upcoming events – conventions, signings, readings.
- What you like to read.
- Reviews of other people’s books.
- Talk about your work and your process.
- Pictures of pets. Honest, if you have pets, give them jobs in your publicity department (e.g. @agentauggie on Twitter).
Edit the About Page
My setup tool created some pages, but it can’t write your bio or fill in your book catalog.
- Use your website’s menu to visit the About page.
If you’re logged in, there should be an Edit Page link on the dark toolbar.
- Use Edit Page to switch the About page into editing mode.
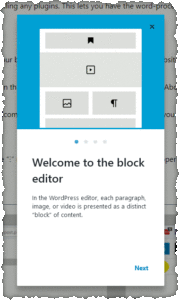
The first time you start to edit a page, you’ll get a “Welcome to the block editor” message which gives you a little tour of the place and includes a link to a guide.
- Take this tutorial.
If you need to see these messages again later, click the “⁝” menu icon (three dots in a column) at the upper right of the screen and select Welcome Guide.
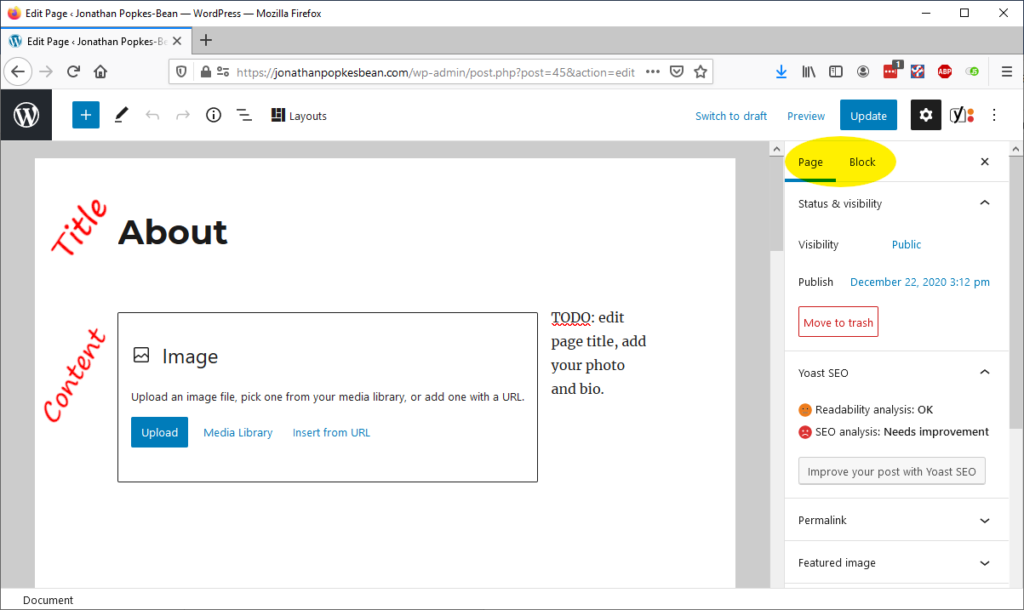
Editing the page looks different from viewing the page. When viewing, parts of the page are general to the whole site – like the sidebar widgets, menu, and header. The editing screen doesn’t show those, but only the parts particular to that page; the title and contents on the left, and other attributes of the page on the right, in areas that scroll separately. As shown by the yellow highlight, there generally are two tabs on the right to edit attributes of the page as a whole, or properties of the selected “block”.
Note: if the right-hand properties area is not displayed, click the “gear” icon at the top right.
My setup program created this About page and added a “paragraph” block to start off with.
Write Your Bio
- Click the page title “About” and change it to whatever you like (e.g. “About Your Name”).
- In place of the TODO text, write a description of yourself for the reading public.
To start a new paragraph, press Enter and keep typing. Click a paragraph to pop up a toolbar to do formatting and links. The bio can be as long as you like. To organize long content with section headings and bullet lists, consult the Blocks guide.
Add Author Photo
You need to add an author photo twice – once as the featured image for search results, and again within the main part of the page so it’s visible in a size and location you choose.
Incidentally, while the obvious way to insert images (and files and whatever) is using the Browse buttons and so on, you can also drag images from a File Explorer window and drop them into your document. Pasting graphics also works, but I don’t like to do that because it doesn’t give a nice filename for the media library, and because you don’t get to choose an appropriate image file format.
- On the right, click the Page tab and scroll down to find the “featured image” box.
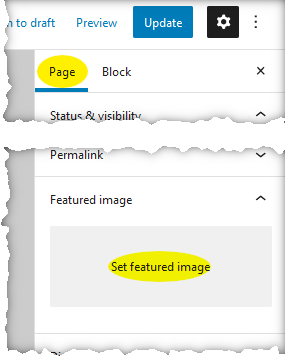
- Add the featured image. If the image is already in your library, click Set featured image.
This lets you upload a new picture or select from those previously uploaded. For the About page, I suggest a photo of yourself. Next, add the same image into the content of your page.
- Click anywhere in the first paragraph of text to bring up the Paragraph block’s toolbar. Click “…” and select “Insert Before”. This adds a blank line above the paragraph.
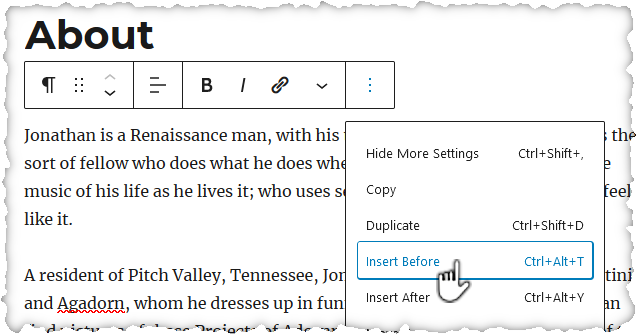
If you prefer using the keyboard, there are keyboard shortcuts for all these commands, as shown in the above screenshot. You can also use arrow keys to navigate and Enter to insert a new block.
The empty block is a “paragraph” by default, where you could just start typing text, but we want an image instead.
- Type “/” (forward slash) followed by the type of block you want, in this case “image”.
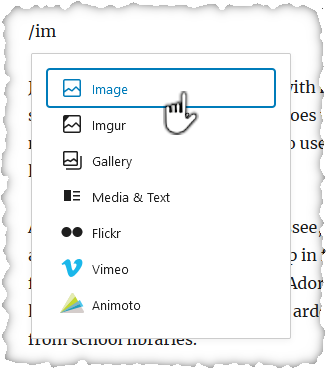
Normally you only need to type a couple letters and the right choice pops up. In this case “/im” was enough to get “Image” as the first selection in the popup list of block types.
- Click “Image”, or press Enter to select the first match.
- Select which image you want. To use the same one you uploaded for your featured image, click Media Library to find it.
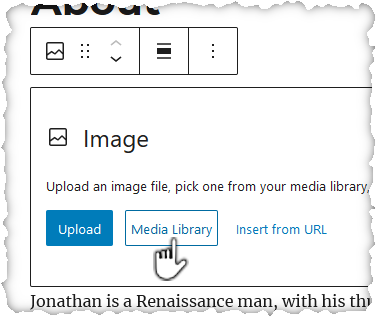
You probably don’t have as many images in your media library as shown here.
- Click the image you want, then Select.

When you add a picture, the controls on the right side of the screen include the ability to specify the image size and other attributes. If you don’t see them, check at the top whether you’re on the Page tab or Block tab – you want Block. There’s also a toolbar above the image containing the alignment/wrapping control and others, and a place below to add a caption.
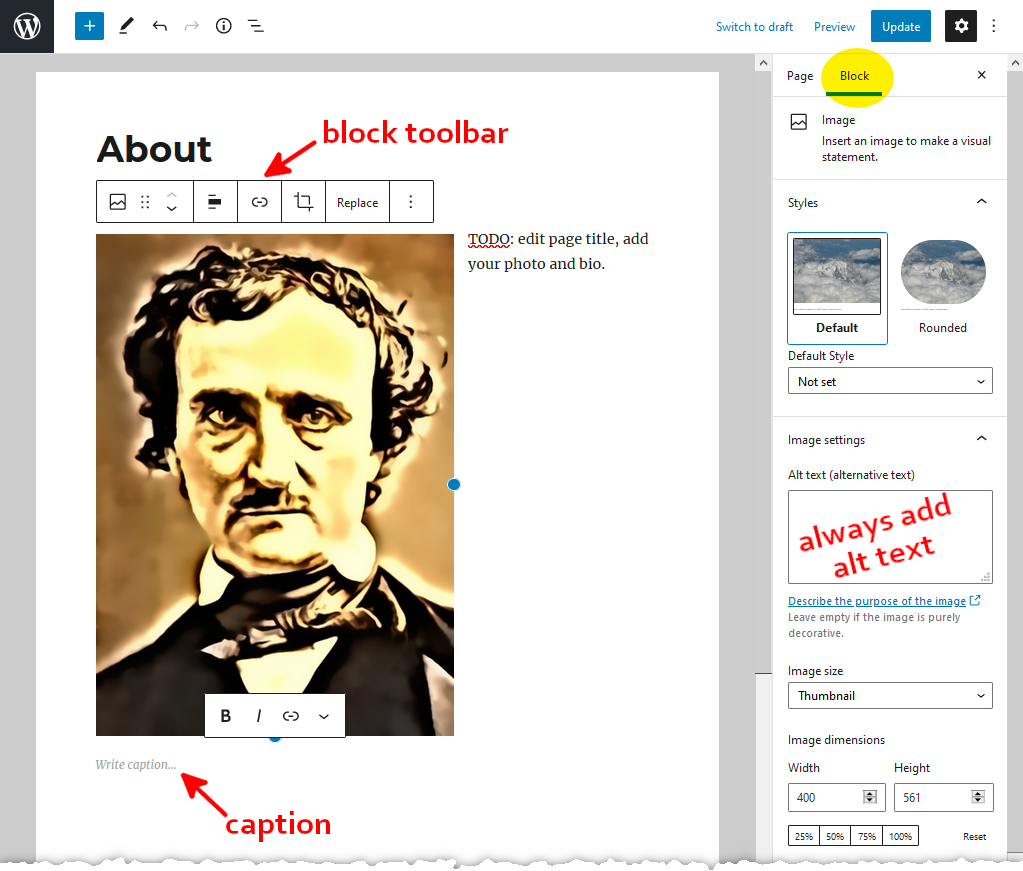
- Explore the controls and edit the attributes of the picture.
Make it left or right aligned, round the corners if you like, add some Alt text for the benefit of visitors who can’t see the picture (e.g. “Photo of Jonathan Popkes-Bean”). Select the “Medium” or “Thumbnail” image size.
- Use the Preview button at the top right to see what the page will look like.
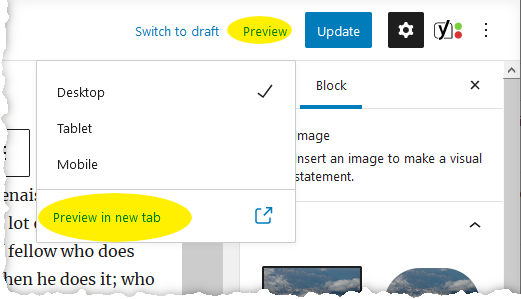
You have a featured image and an embedded image, but if you followed the instructions in Featured Images only the latter will be visible when viewing the page.
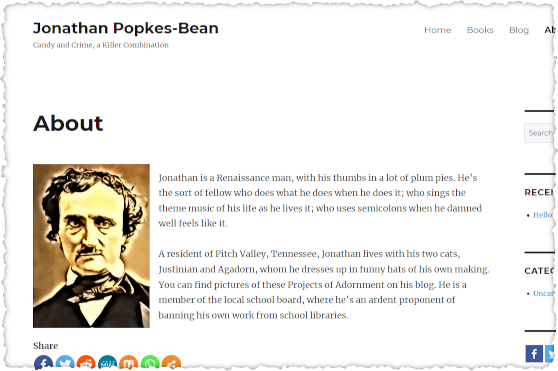
As described in Change Your Theme to Twenty Sixteen (Temporarily)
- Try the page on various simulated devices to make sure the image is a convenient size.
Since a lot of people use phones for web browsing, make sure the image size isn’t such as to take up two thirds of the screen width, leaving too narrow an area for text.
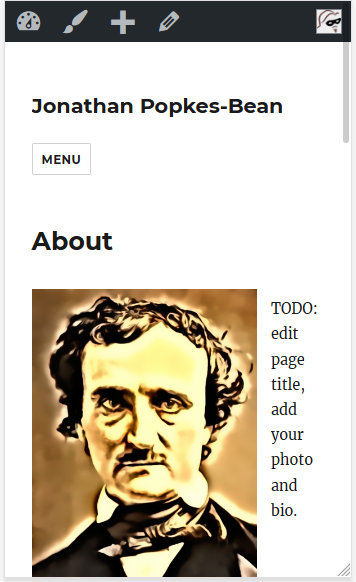
This screenshot shows the problem. If you wrap text around an image in the range of 180px to 300px wide or thereabouts, it’ll look odd on some devices.
I’m not saying to test various devices every time you use a picture in a blog post. Test important pages, like this one, but in other cases, just keep an eye on the width shown in the Image properties tab, and don’t size it in the problem range.

If the width is a problem you could scale it down, or not wrap text around it, or put it in a responsive “columns” block, for instance, where the column block will take care of not letting a column get too narrow.
Don’t worry about making images too wide for the phone. They will shrink as needed to not exceed the screen width.
Besides using the controls above, you can scale the image using “handles” on the right and bottom edges. It’s a bad idea to scale a small image up because it’ll get fuzzy. Only scale images down from their original size. Refer to Image Size for more information.
Next, think about what you want to happen when a user clicks the image. The default is “nothing.” Sometimes you want the image to be a link to a different page or website, and sometimes you want to enlarge the picture to fill the screen. To control this, there’s a “link” toolbar button associated with the image block. This lets you either type a URL or select to link to the Media File, which is to say, show the image full size when clicked. (Ignore the Attachment Page option, which is useless).
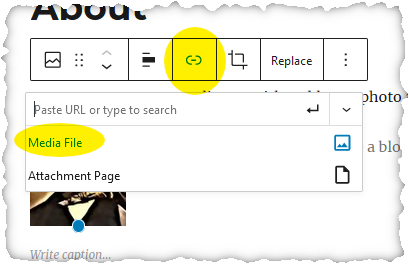
Whichever option you choose, you have more controls in the drop-down to the right of the URL field. The only one likely to be of use to you at this point in your website-building career is “Open in new tab.”
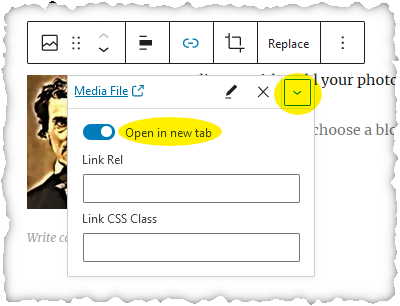
With your setup, “Open in new tab” applies only if you enter a URL – not if you select Media File. That’s because my setup program installed a plugin that makes images open the modern, professional-looking way, in a “lightbox” covering the current page instead of in a new tab.
Media in your library is available for use sitewide, not just on the page where you originally added it (however WordPress does remember which page it was originally added for). You can also add things to the Media Library from the dashboard while not editing a page. Deleting the image from a page, or deleting the entire page, doesn’t delete the image from the library.
Add Other Media
As mentioned above, you can insert images into the body of your page by just dragging them from a file window. The Blocks editor is also pretty smart about recognizing other media. For instance, to insert a YouTube clip, you can just paste the URL of the clip onto a blank line. To add a file attachment, you can also drag the file into the editing window. Only certain file types are allowed to be attached, for security reasons, but you can change the list of allowed types.
Publishing Options
It’s time to publish your changes. A blue button at the top right says Publish or Update, depending whether this is a new page or an edit to an existing one. In addition, the Page tab on the right has selections to control how and when the page is published.

The Visibility option lets you select whether this page is visible to the public, or just you (when you’re logged in) or whether it’s password protected.
If the page or post hasn’t been published yet, clicking the date next to Publish lets you select a later date for this to happen automatically. This isn’t useful for pages, but lets you create a queue of blog posts to publish at specified times, so you can write them in advance and post them at the time of day you consider optimal.
If you use delayed publication, keep track of what’s queued up so you can cancel a post if it would be insensitive in the context of recent events.
Preview and Publish
If you changed anything, Preview will refresh the preview page if you still have it open.
- When satisfied with the appearance, click Update. (The button says Publish for a new page).
Test and Personalize Your Contact Page
It’s usually best not to post your email address on your website. Spammers scan the Internet looking for addresses to add to their mailing lists.
To get in touch with you, the setup program added a plugin that provides the ability to create contact forms on your site. It also created one such form, and a Contact page on which the form is included.

- Try the contact form – use it to send yourself email, which goes to the administrator address shown on Settings > General in the dashboard. If it doesn’t arrive, make sure the email address is correct and check your spam folder.
When you submit the form, the fields are cleared and you get a “thank you” message below it. It’s possible to do something else, like go to a separate “thanks page”. I think that’s unnecessary, but those options are available.
- Edit the page, like you did the About page.
You can see the contact form in the editor, but you can’t edit the actual form from this screen – just choose where on your page to include the WPForms block. What you can do from here is edit the text above and below the form. Make your changes, and save them.
- If you’d like to change the form itself – add a phone number field, say, or change what email address the notifications are sent to – go to WPForms in your dashboard, find the form in your list of forms (there should be only one form in the list), and click to edit it.
I won’t go into detail because this plugin is pretty easy to use, which is why I chose it, and they have their own documentation with videos and all.
Filter Out Spambots
The contact form created by my setup program created a contact form, but did nothing to prevent evil spambots from using it to send you spam. You’ll need to do this yourself as it requires registering your site with a spam protection provider.
WPForms supports spam blocking services: reCAPTCHA from Google and hCaptcha from… hCaptcha. I strongly recommend hCaptcha because, first, they pay you a little money for the work people do in identifying pictures with trains in them or whatever, and second, unlike Google, they respect your visitors’ privacy and don’t put their fracking logo on every page of your website.
- Go to your dashboard, to WPForms > Settings. Click the CAPTCHA tab, and select hCaptcha.

This screen contains a link to instructions for how to register with hCaptcha and obtain the Site Key and Secret Key to fill in here.
- Follow the link, read the instructions, register with hCaptcha, add your website on the Sites screen, get the Site Key.
- Go to the Settings screen for the Secret Key. Add these keys to the WPForms Settings screen, and save your changes.
- Go to WPForms > All Forms in your dashboard, find the form in your list of forms, and click it to edit. In the group of Standard Fields buttons on the left, click the hCaptcha button. Click Save and X at the top right to save changes and quit the form editor.
- Try your contact form again to confirm hCaptcha is working.
Customize Your Book Catalog Page
The “My Books” page created by the setup program includes placeholder text you’ll want to customize. The page displays a grid of all the books in chronological order.
At the moment there are no books in it, so it’s not much to look at. When you’ve entered your books, though, it should look something like this:
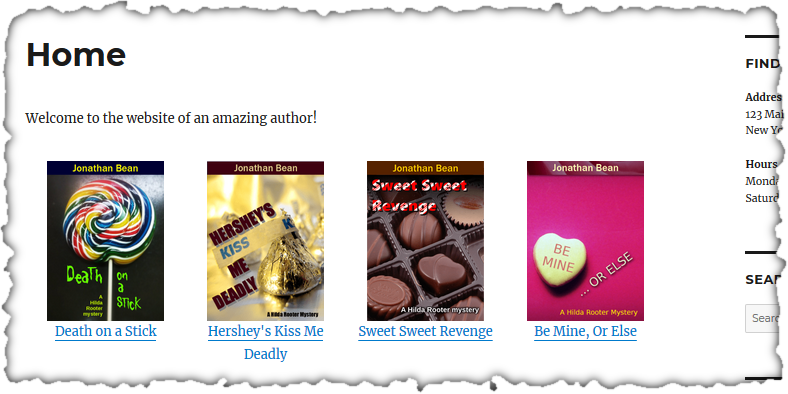
The Mooberry Book Manager plugin provides the grid and supplies a special kind of page, the book page, as opposed to a regular page like “About.” You’ll create a book page for each of your books. This form has book-related fields and a standard way to arrange the information on screen. The plugin also gives you the ability to easily insert grids of cover images and titles in any page, sorted by date, by series, or in other ways. The setup program creates a grid showing all the books sorted chronologically, and you can create grids to show a subset or to sort or group them differently (e.g. by series). There’s also a way to insert a featured book in your sidebar.
You could instead create regular pages that describe the books, include cover images, retailer links, and so on, and create other pages that list all books together, using the abilities already in WordPress. However, it’s a lot of work to format these pages consistently and keep the grids up to date. The plugin does that work for you.
- Go to the My Books page (currently at the “Home” link of your menu) and use the Edit Page link on the toolbar to open the page editor.
The Mooberry plugin uses a shortcode – an expression in square brackets – to indicate where the book grid will appear. The shortcode contains a number identifying which grid to insert.

- Edit the TODO text before the shortcode to personalize this page. Also add text afterwards if you like. Save your changes.
The dashboard contains a Book Grids screen, where you can see the list of grids, create and edit book grids, and find out what value to enter in a Shortcode block to make the grid appear at that point in a page.
Later we’ll see how to make new grids and place them on pages. First though, create a book page for each of your books.
Add a “Single Book” Page
- In the dashboard, go to the Books > All Books screen. In the illustration below, I’ve already added a couple of books.
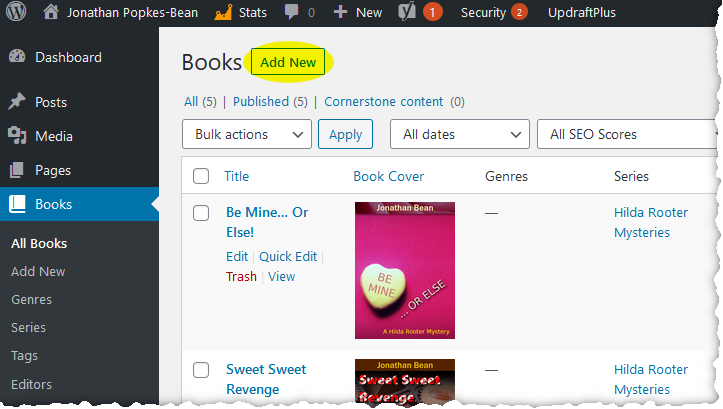
- Use the Add New button to create a book page for one of your books. It doesn’t matter what order you create them in (you’ll enter the publication date, series name and order, which can be used to sort them).
A book page looks different from a normal free-form page. It has book-specific fields, and rather than being able to create blocks and drag them around, everything will appear in a predefined location.
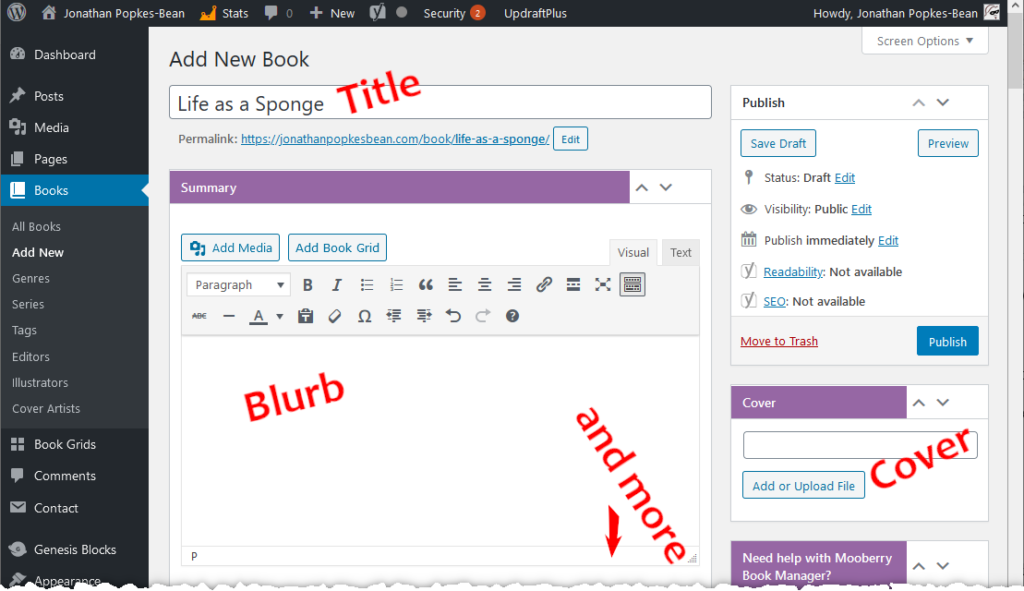
The locations of input elements on the book editing screen doesn’t match their location when viewing the finished page.
- Look through all the fields and decide which ones are important to fill in for your book, but these at least:
- Title, and subtitle if any.
- Summary should contain the blurb. Notice the row of formatting buttons above this field. This is a simple word processor (the “classic” editor). Normally you’ll just enter text here, but you can use the Add Media button to add images or a book trailer video or other things. The cover image doesn’t go here. You might put a back cover image here, though.
- Cover (upload image). Put the cover illustration into the “Cover” box of the form, on the right. It’s similar to the featured image for a normal page.
- Publication date (so the books can be sorted in date order in the grid).
- If part of a series, fill in Series and Series Order. These aren’t near each other as you might expect. You can add a new series “on the fly” on this form.
- Retailer links. The page lets you select a retailer and fill in the URL to the page where the book can be purchased, and has an “Add retailer” button to list additional vendors.
- Publish the new Book page. Then View Page; you’ll get something like this:

Here is the title, book cover image, buy buttons (Jonathan only made this book available on Amazon), and a summary.
This screen also shows a list of all the books in the series, in series order, with links to their pages. That’s the effect of entering the Series and Series order values.
There are many other fields on the Book form. Use your judgment about what’s worth entering, based on what potential buyers will find relevant.
- You can hide sections of the form you never use. Scroll to the top of the editing screen, and at the top right, look for a Screen Options control. Click this, and use checkboxes to control which sections are visible.
Hiding a section during editing doesn’t remove whatever information might be in the section already; it’s just a way to declutter the editing screen. You can do this on any dashboard page – not just the Book editing page.
Create More Book Grids
If you have enough books that you don’t want to display them all in a single grid, go to the Book Grids dashboard screen.
- Optional: use the Add New button to create additional grids, which you can later place onto pages.

For instance, if you write multiple series, some website visitors are looking for the series order, to know which one to look for next. This may not be the same as the chronological order I’ve set up by default. But other visitors want to see the chronological order. So you could include both on the My Books page – a grid of everything in chronological order – like the setup program added – then a grid grouped by series (one of the choices when you create a grid).
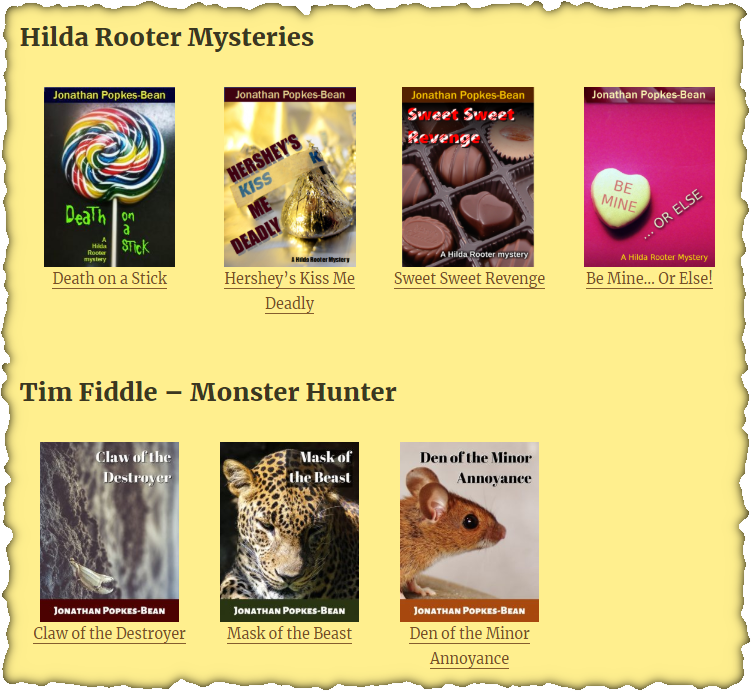
Or if you want introductory text describing the series, make a separate grid for each series and include each grid on the page with a text above it describing the series.
If you’ve written tons of books, you might create multiple pages with different cross-sections of your oeuvre, with a menu selection or crosslinks between pages. You might create a page for each series, using a grid on each page that’s limited to the one series.
While you’re creating a grid, note the shortcode displayed on the right – an expression beginning “[mbm_book_grid…”. You’ll need this when you go to insert the grid onto a page.

You can also get the shortcode for an existing grid from the screen that lists all the book grids.
Set a Landing Page and Posts Page
The landing page or front page of your site is the page people see if they go to yourdomain.com. Because many visitors are there to find your books in their proper order, my setup program initially set the landing page to the “My Books” page.
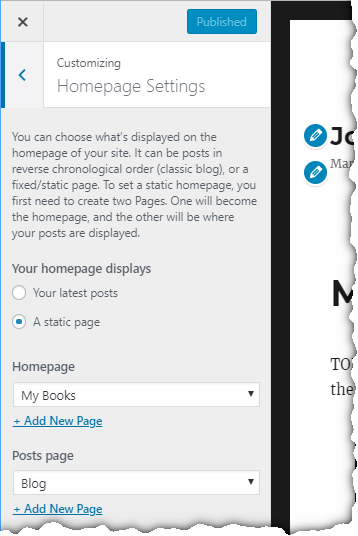
- On the Customize screen, go to Homepage Settings in the menu.
- If it’s not already selected, select the radio button “A static page.” This makes additional fields appear.
- If you want a different page as your landing page instead of the one shown, select it here.
The way my setup program configures things, the homepage of your site doesn’t display your blog entries. Instead, the setup program made “My Books” your landing page, created a separate page titled “Blog”, and added it to the menu. The title “Blog” isn’t special, though. You still have to do something to make the blog appear on that page.
The “Posts page” selection controls which page of your site, if any, will have blog posts automatically inserted on it. When a visitor goes to the page you specify here, WordPress replaces the page’s “content” area with a list of blog entries.
Manage Your Menu
Some themes automatically display a menu of all your pages, but it’s better to create your own menu to control which pages are included, in what order. My setup program already did that, but you might want to rearrange it or add pages.
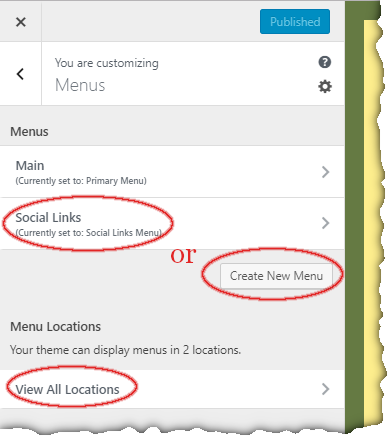
- In Customize, click Menus. You can have multiple menus on the site. In this case you’ll probably have “Main” and perhaps “Social Links.”

- If there’s already a “Top Menu” or “Main Menu” or similar, click to edit it. If not, click Create New Menu and choose an appropriate name.
Note: if the menu already exists, you have a shortcut to edit it. Click an edit icon – a pencil in a blue circle – to navigate to the section of the Customize menu that controls that part of the screen. Or Shift+click a menu item.
- If the menu doesn’t already contain everything you want, click “Add Items” to select from among the list of pages. Use the “+” symbol to the left of the page name to add it to the menu.

Below the list of menu items is a list of menu “locations” – places menus can appear on your site. The list varies from theme to theme, but normally there’s a location called “Main,” “Primary,” “Top,” or the like—the main menu of your site. Checking the box makes this menu display in that location. Menus can exist with no locations checked, so they aren’t displayed anywhere. This menu is supposed to be your main menu, so the setup program already checked the appropriate box.
The Pages list in the Add Items pop-out contains two types of entries: regular Pages, and “Home Custom Link.” The latter refers to the landing page of your site — the URL “yourdomain.com.” In the previous section, you might have changed which page that is – the setup program sets it to “My Books.” If you did change it, there’s now no way to navigate to “My Books”, so you should add it as a new menu entry.
While editing the menu, you can:
- Drag to change the order of items.
- Click a menu item to expand it, to edit the text of the menu item (it need not be the same as the page title), or to find the control to remove the menu item.
- Create a multilevel menu by indenting items.
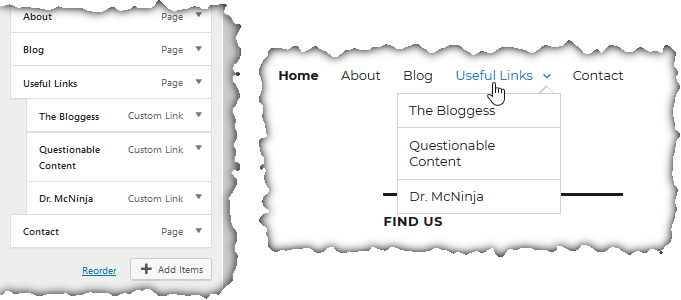
In this screenshot, I have menu items for my own pages and also “Custom links” to other websites.
- Edit the menu to suit yourself, then click Save & Publish.
Set Colors
Everything we’ve customized up to this point are generic settings that apply to any theme. The next sections are specific to Twenty Sixteen, so if you choose a different theme you’ll have different (and in most cases more) options to play around with. I just want you to practice doing this type of customization now.
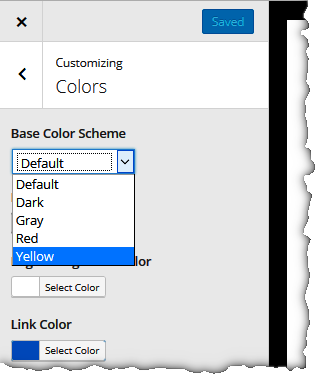
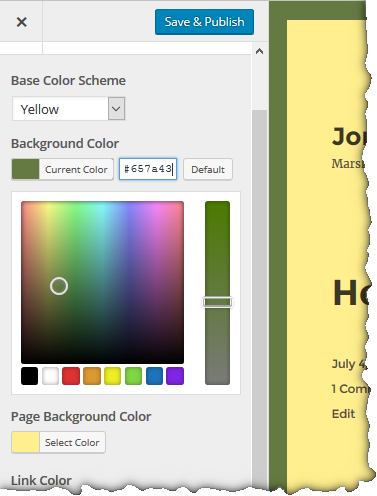
Let’s change the look of the site.
- Still in the Customize screen, navigate to Colors.
“Twenty Sixteen” theme has some preselected sets of compatible colors.
- Select a Base Color Scheme, then try the various Select Color buttons until you find something pleasing.
- Save your selections using the Save & Publish button.
You don’t have to save every time you move to a different part of Customize, I just want to lock this much in before proceeding. Again, different themes will have different menus and options for adjusting their colors, as well as fonts, overall layout, and so on.
Header and Background Images
Twenty Sixteen theme supports sitewide graphics in the page “header” and as a background. Let’s see how much jazzing up we can do with those.
Header Image
- From the top level of Customize, click Header Image.
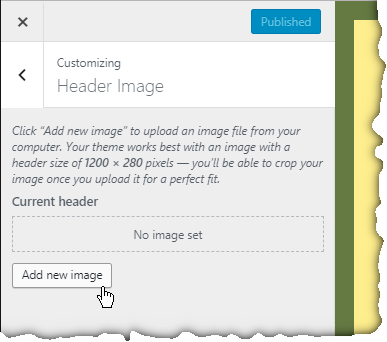
Many themes come with preloaded header images — this one doesn’t. In either case, you can upload your own.
Remember, the media library is a central repository, so any images uploaded earlier while editing pages are also available here.
- Click Add new image, and upload any large picture from your disk to experiment with.
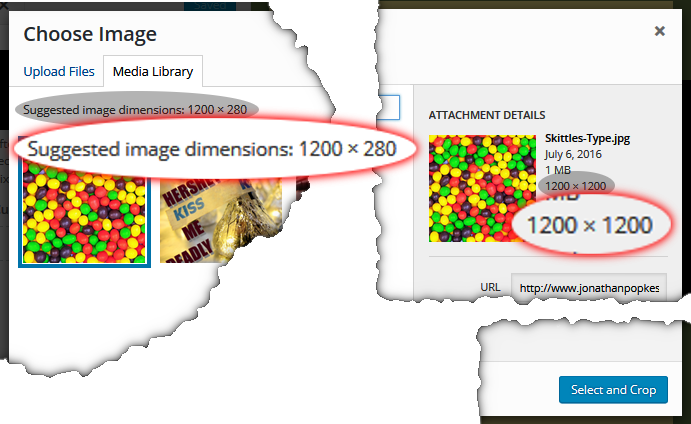
My image of Skittles is 1200 x 1200 pixels, larger than needed (the theme asks for 1200 by 280) and the wrong ratio of width to height.
- Click Select and Crop, then select a portion of the image the right shape and size for this theme’s header. The height and width of the selection rectangle will automatically be in the right ratio.

- Click Crop Image, and see how it looks on the page.
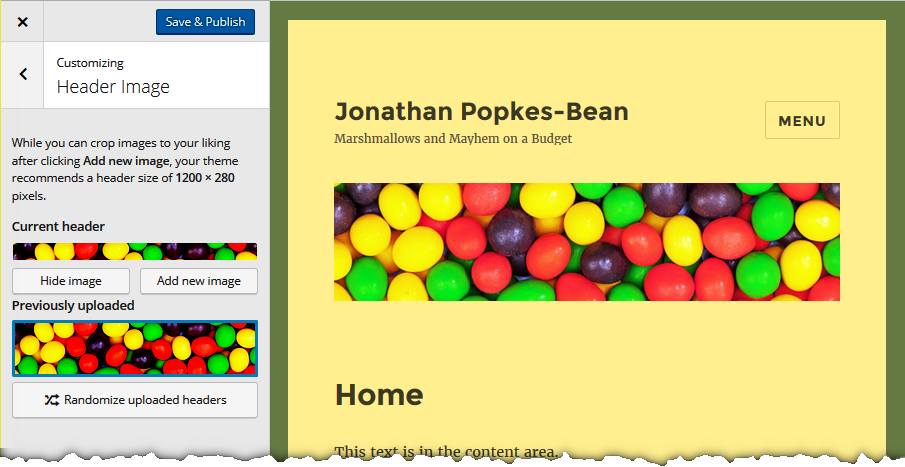
On the left, your current header is shown, as well as any other images that came with the theme or that you added as a header. There’s also a button to randomly select an image each time someone goes to a new page.
I like the look of this, and it’s easy to undo if I change my mind.
- Save & Publish
Different themes do different things with the header image, and will want different dimensions of pixels. An image that works for one theme probably won’t be right for another.
In this theme, the site name and tagline appear above the header image. You could instead create an image that includes the site title as part of the graphic, as shown below. To hide the text version of the header, there’s a checkbox in the Site Identity section of Customize.

Some themes (not this one) also give you an option to overlay the header text on the image. It may be a challenge to find a background image that text shows up well on all sizes of screen, so I generally prefer to make the text part of the banner anyway.
Background Image
- Go to the top level of Customize and select Background Image.
- Click Select Image, and upload and select a smallish image. The image will tile both across and down the page (though it’s only visible as a thin outline).
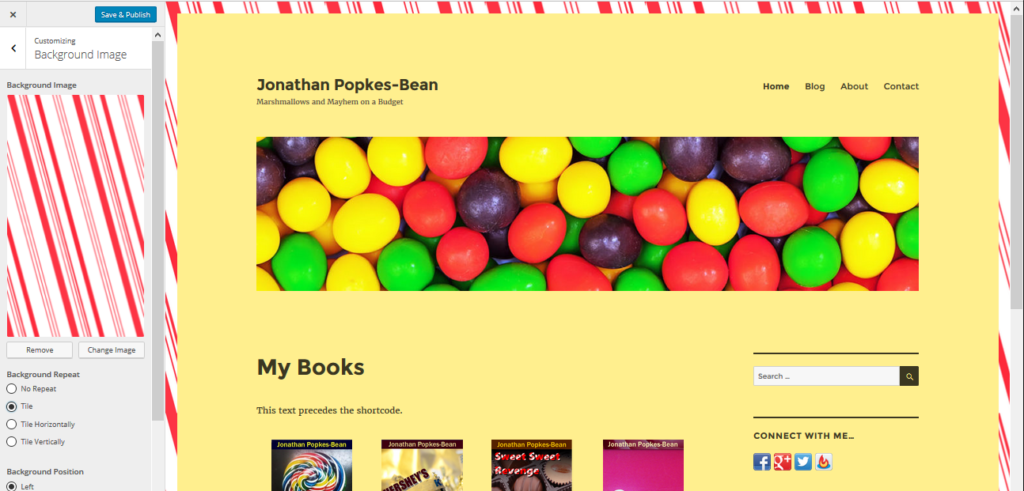
Different themes do different things with your background image. In some cases, it might appear behind your text on the page, which could make your text hard to read. So, again, a graphic that works for one theme might not be appropriate for another.
Use the tiling and alignment options to only use the background image on one edge or corner of the screen, with your chosen background color everywhere else. This is nice for gradient effects that merge with your background color.
The peppermint-stripe background is a bit much, so I won’t save this change.
- Either publish your background change now, or use the X on the top left to exit Customize without saving.
Share Buttons
My setup tool installed a plugin, Sassy Social Share, to let people easily share your content to social media.
- Go to Sassy Social Share in the dashboard to configure this function.
I chose this plugin because it’s respectful of your visitors’ privacy, includes buttons for a lot of different services, and has an option to display “floating” buttons that stay at the same place on the screen as the page scrolls. There are a lot of options, and I won’t try to tell you how to set them, other than to note that I never use “share counters” and “like counters” because that requires contacting the social media website as the page is loading. That lets them spy on your visitors.
Go through the different tabs on this page and set things the way you like. On the Floating tab there’s an option to “Display vertical interface only when screen is wider than x pixels”. After you settle on a theme, if you want to use floating buttons, test your site in various simulated screens (as above) to find the best value for this setting. The browser’s device testing screen shows the screen width at the top.
The plugin settings also let you disable sharing for all pages and display them only on posts, if you prefer. Look for “Placement” on the Standard and Floating tabs to select which types of pages you want to encourage people to share.
There are some pages it never makes sense to display share buttons on. Your contact form, a “thanks for subscribing”, etcetera. This plugin provides two checkboxes on the page editing screen to disable share buttons for that page.
Widgets
A widget appears in a designated part of the webpage called a widget area. A widget area appears in the same place on every page of your site (mostly. Some themes have front-page only widget areas, etc). The widgets they contain can include site searches, recent posts, Instagram feeds, text you enter, and many other things.
Different themes have widget areas in different places, but it’s common to find a header, footer, and often a sidebar area. Twenty Sixteen has no header widget area, but it has a sidebar and two bottom areas.

- Open the Customize menu to Widgets, or click the blue pencil icon next to the widget you want to work with. (The blue pencil isn’t shown if the widget area is empty.) The setup program has pre-populated the sidebar widget area for you, and your hosting provider’s WordPress installer may also have added some items.
- Click Sidebar to find out more about the widget area with that name. Compare the list of widgets with what’s in the website preview.

You can drag these items up and down in the list on the left, or click to expand an item and set its attributes. Leaving the Title field blank is an option, as I did for the Search widget since it’s self-explanatory.
- Move, retitle, delete or make any other changes you would like to these widgets. You don’t need the Meta widget. If it’s there, remove it by clicking to expand it, then click Remove.
Click Add a Widget to select from a list of all the types of widgets available.
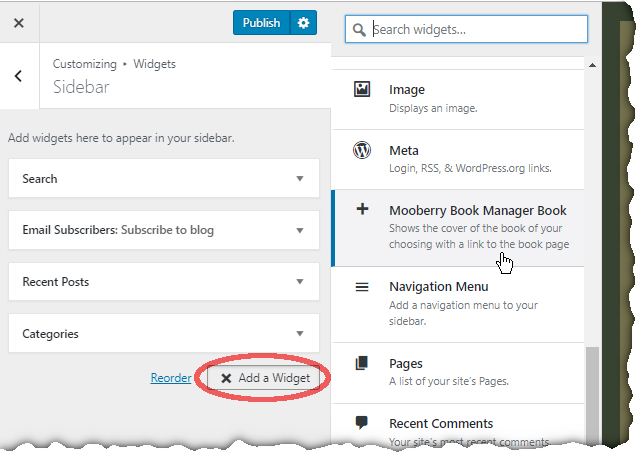
Some widgets, like Search, are part of WordPress. Some may be contributed by the theme. Others, like Mooberry Book Manager Book, are added by plugins.
Mooberry Book Manager Book lets you choose a featured book cover to display on the sidebar, with a link to the book page. In this case, however, I think it’s better to use the Text widget so that you can also include an enticing description.

The Text widget is like a page within a page, with a title and content area. Using this, you can add text about the book, then use the Add Media button to include the cover image.
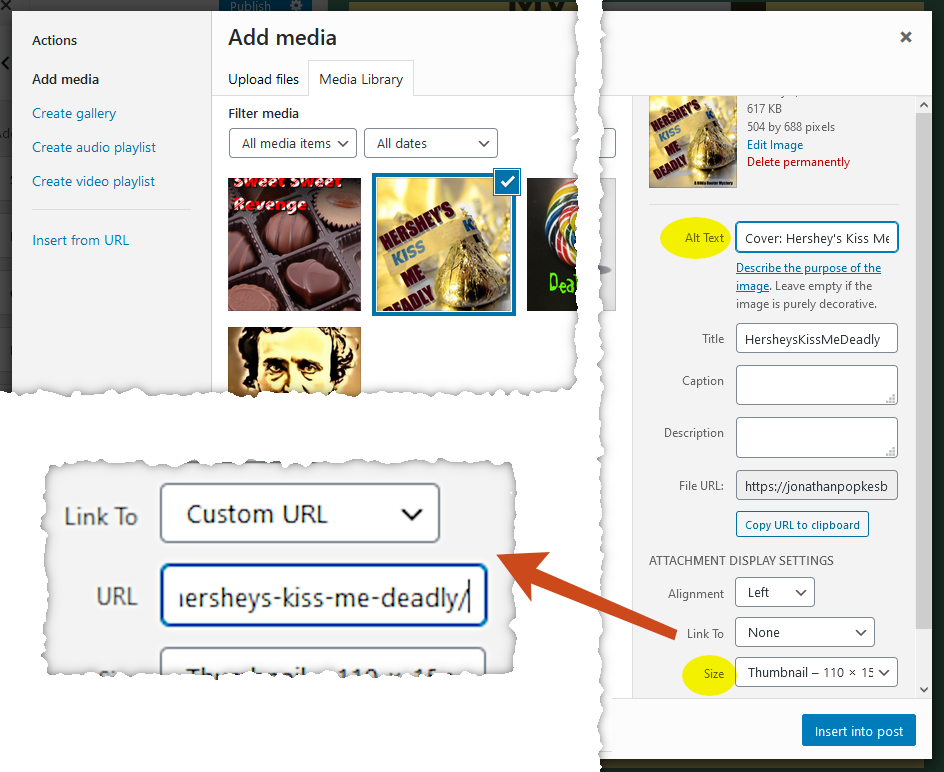
When you add media, don’t forget the Alt text. Thumbnail is an appropriate size here. Make the picture a “Custom URL” link to your book page (you can get the URL by going to that page, and copying it from the address bar of your browser). If you like, you can also add your own buy link in the sidebar, linking to the Amazon page or wherever.
- Publish your Customize changes.

Social Links
If you’re active on social media, give your website visitors an easy way to find and follow you there. I’ll show two different ways to have a set of icons linking to your profiles on various social media platforms.
The Social Links Menu
Some themes, including Twenty Sixteen, have built-in ability to display icons that link to your social media profiles. You just have to enter the URLs.
- Go to Menus under Customize, and find or create a social links menu.
It’s possible your selected theme doesn’t support this. Look under “View All Locations” to see whether there’s such a menu location as social links. If not, skip to the next section.

- Check the “Social Links Menu” checkbox to give the new menu that special role. The menu items you add appear in the Customize preview as social media icons. Twenty Sixteen puts them way down at the bottom right, tiny and monochrome, which isn’t great, but you may end up using a theme that shows them better.
- To add your social links to the menu, click Add Items, then expand Custom Link, fill in the URL and Link Text. The Link Text is just for your reference – the URL is what matters). Then click Add to Menu.
- Do this for each social media page of yours. The system will figure out which icon to display based on the URL.
- Don’t forget Patreon!

Social Media Links Using a Plugin
If your theme doesn’t support using a Social Links menu (or if, like Twenty Sixteen, the implementation is unsatisfactory), use a plugin. The same plugin I had you install for share buttons, Sassy Social Share, includes this capability. Another good plugin is Social Icons Widget by WPZOOM. Both plugins supply a new type of widget, so you can put your social media icons in your sidebar or wherever your theme provides a widget area.
To use a plugin for this, once it’s installed and active:
- Start Customize and go to Widgets > Sidebar (or choose a different widget area if you prefer).
- Click Add a Widget and find the social icons widget for whichever plugin you’re using – “Sassy Social Share – Follow Icons” or “Social Icons by WPZOOM”.
The dropdown form for this widget is long, but not complicated. Add your social media links in the appropriate fields, then use other settings to adjust their appearance.
- If using Social Icons Widget by WPZOOM, click Apply before you Publish, or your changes might not be saved. It is a bug.
- Publish when ready.
Blogging
- On the toolbar of your site, find the New > Post control.
- Write your first blog post.
Writing a blog post is much like writing a page, with a couple more things to pay attention to. At this time, create a couple of test blog posts just to see how it works. The sections below discuss ways in which creating posts differs from creating pages.
Excerpt
When a post is displayed on your Blog page or other list of multiple posts, the text is generally truncated at a particular length, and the user can click to see the full post on its own page.
Use the “More” control on the editor toolbar to select the point at which the text breaks off when the post is shown in a list.
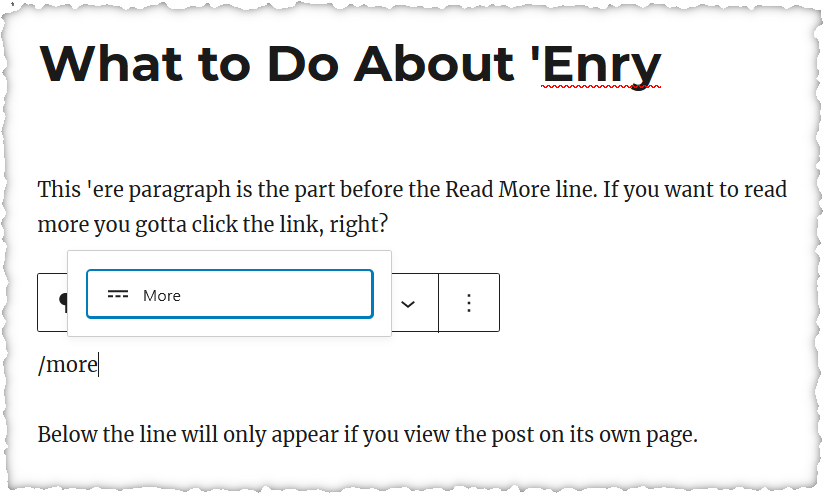
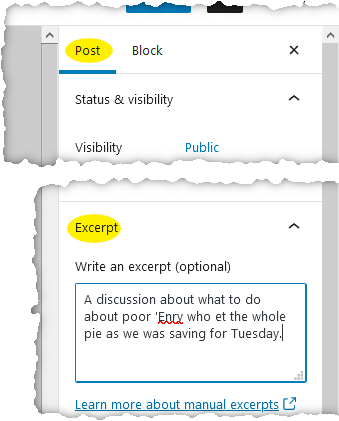
This is good if the best text to display as an excerpt is at the start of the post. If not, use the Excerpt field instead to enter whatever text you’d like. It doesn’t have to be from the post.
The Excerpt section is in the Post tab on the right of the post editing screen, generally a ways down. Some themes also have an Excerpt field when editing pages (I think they all should since pages also appear in search results).
Post Category
- Select a category for the post.
The category is the basic type of the post. Jonathan has four categories: Announcements relating to publications, Recipes (mostly candy), Personal News, and Adorned Cats, where he shows pictures of his pet felines in costumes. His list of available categories reflects this.
- As you write your test posts, think about what categories you’d like, if any.
If you fail to select a category, everything will be in the default category “Uncategorized”.
You can create new categories on the fly while editing the post, or manage the category list via Posts > Categories in the dashboard.
You can create a sidebar widget that lists the categories as links, so visitors who are only interested in hats on cats can view a list of only those posts if they choose.
Another way to let people navigate to a particular blog category is via submenu items below Blog.
It’s possible to establish email or RSS subscriptions to a specific category rather than to all posts. If you want to explore this, search this site for “RSS”.
Tags
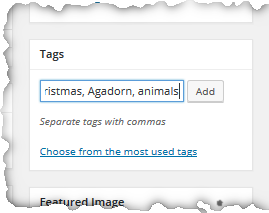
The Tags section on the blog post editor page lets you enter keywords relevant to the post. This can be used for grouping posts on a particular topic, or for creating tag clouds. Using tags boosts your SEO score a little.
Generally, use words from the article.
What’s the difference between categories and tags? They sort of do the same thing, right?
Think of categories as the table of contents of your blog, while tags are the index. The category is the broad type of post, and the tags are the exact topic. Use just a few categories, and many tags. If people are only interested in following a subset of posts, they’re most likely to choose a category—in Jonathan’s case, you might like to hear about his publications and see pictures of his cats, but not care about his personal life or recipes, however tasty they both might be.
I originally had way too many categories because I started out using them as if they were tags. The plugin Categories to Tags Converter by wordpress.org is an easy way to reorganize that without editing all your posts manually.
Publication Time
As described in Publishing Options, you can specify a later time for your post to become visible.
Because posts are sent out to subscribers, and might be auto-posted to social media, it makes sense to select a time to post when the most people will notice it. As will be described later, you can see what days and times your site gets the most traffic, and target those times.
Exclusion from Search Results
Some pages on your site, you might not want people to find with a search. For instance, a “thanks for donating” page, or confirmation of email subscription, you want to be reachable only by donating or signing up for newsletters. So far that’s not true of any existing pages, but bear it in mind for later.
The ability to exempt pages from search isn’t built into WordPress, but my setup program installed two plugins that help with this.
One, named Search Exclude, adds a checkbox to the page editing form.
Checking this box hides the page from your own site’s search function.
If you have two checkboxes to exclude the page from search, your theme includes this ability, so you don’t need the plugin. In that case, go to Plugins in the dashboard, and deactivate Search Exclude.
The other type of search you need to worry about is a web search, for instance via Google. Search engines pay no attention to the Search Exclude option when indexing your site, so the page you wanted to hide might still come up in search results if Google manages to find it.
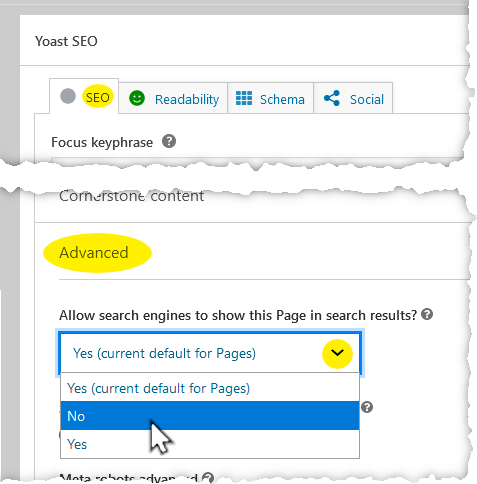
Search engines index a site by “crawling” it – following links – so you might think they won’t notice your page if you don’t have any links to it. But they can be surprisingly clever about finding every page, so there’s also an option to tell them to ignore this page if they do run across it. This option is provided by the Yoast SEO plugin. My setup program installed Yoast, but you may have to activate it to try the next bit.
While editing a page, scroll down to find the Yoast settings, SEO tab, Advanced section, and the Allow search engines to show this option, which you can set as appropriate for this page.
Configure Automatic Mailings
There are different ways to add the ability to let people subscribe to your blog. My setup program installed a plugin that handles everything on your own site, using your server’s ability to send email. Alternately, you can use outside mailing list services like Mailchimp, which is free for mailing lists that aren’t very large.
I prefer Mailchimp, but it’s harder to set up and manage. Your website is already set up to collect subscriber information and store it on your own server. If you’d like to try Mailchimp instead, read about your options and find instructions at torknado.com/rms.
Or, just continue to use the Email Subscribers > Campaigns plugin, which should already be set up and working. If you subscribed to your own mailing list earlier, you should already have email notifications of the blog entries you created earlier.
Add a Privacy Policy
People have started to be concerned what information websites collect about them and who they share it with. WordPress includes the capability to automatically generate a privacy policy page for your site, which you then must customize.
- Go to Settings > Privacy in your dashboard.
- There may already be a page called “Privacy Policy”, and you just need to click a button to designate it as your official privacy policy page.
- If there’s not already such a page shown in the list, create it by clicking a Create button.
This automatically created page has boilerplate privacy information on it. You need to edit the contents to suit your situation. By designating it as a privacy page in the settings, the theme may treat it in a special way (depending on the theme).
- Go to Pages in your dashboard, find the Privacy Policy page, and click to edit it. The boilerplate text is mostly fine for most sites created from the instructions in this book. There’s a section about who you share visitor data with, and I hope you can answer “Nobody.”
If you’re using the Email Subscribers plugin to collect subscriber email addresses, you should disclose that these are stored on your site. If you’ve decided to use a third party mailing list manager like Mailchimp, you should disclose that as a form of information sharing (Mailchimp will not share the list with anyone else though).
If you’ve used plugins besides those I’ve recommended, those plugins may be using tracking cookies or otherwise trying to figure out visitors’ identities and coordinate with other websites, especially Facebook, which is an evil tentacled monster of people tracking.
- Review the privacy policies of the plugins to see what information they collect, so you can disclose this in your privacy policy (or so you’ll know to look for different, less intrusive plugins).
- Enter your website’s URL in a free privacy test site such as webbkoll.dataskydd.net.
The privacy tester report is a good way to evaluate your site for privacy concerns. The report might flag some technical issues you can ignore. What interests us is the list of cookies created by your site, which is a major way other sites track your users’ visits to your site. If there are cookies of a concerning kind, you can find out which plugin is generating them by deactivating plugins and retesting the site.
- Update and publish the privacy policy page. Your theme should automatically display a link to it somewhere, typically at the bottom of each page.
- If not, add such a link yourself with a text widget or menu item.
Enough to Start With
What you have now is a solid, professional-grade, secure site. Write some content, finish up anything you feel needs finishing. Read Theme Selection to learn how to select and customize a different theme, for an appearance in line with your tastes and with the type of literature you produce.
From here on, I discuss optional features and alternate ways of doing things, how to migrate your website to your real domain (if you didn’t create it there), and how to manage the website.
If you have time to do more than the minimum, the most important things you can to do improve your site are:
- Request an SSL/TLS Certificate. This increases security and improves SEO.
- Use a Security Plugin) to block hackers better.
- Enable Periodic Backups as insurance.
- Event Listings so your fans can find you.

