Start here if you’re ready to register a domain and obtain hosting. Being ready includes knowing what domain you’ll register and which hosting company you’ll use. For help determining these things, refer to the Website Basics chapter — also for explanations for the steps in this section.
If you just came here for the setup tool, here it is. There’s another download button at the point in the instructions where you need the file.
Table of Contents
How to Use This Chapter
Assuming you’re reading this material from a screen, it’s helpful if you can have this page up on one monitor (or a separate tablet) while working on your website on another monitor. I adore multiple monitors.
“To do” steps are highlighted so if you want to just do things as opposed to reading all the explanations, you can. Search for the text “**” to find the next action step.
- Set up your monitors to read and work at the same time.
Website software occasionally changes, or you may have chosen a different hosting service than my examples, so the picture may not be exactly what’s on your screen. Be flexible; look around for the elements mentioned in the text, wherever they might be.
If you have multiple computer monitors, I find it’s helpful to make changes to your site design on one screen, while checking the results on another.
Read on if you’re ready to GO GO GO. Start your stopwatch.
Register Domain and Obtain Hosting
If you already have hosting with a company that supports WordPress, and don’t want to change, skip this section. Otherwise, I’m assuming you already compared prices and services and selected a hosting company as described in Where to Get Hosting.
The illustrations below are from SiteGround, which may not be the best choice for your situation. The picture changes over time, there are occasional sales, etcetera.
The key points are:
- Choose the minimum level of service that allows the number of websites you want.
- Don’t pay for anything besides hosting at this time (and an email account if you want that). Uncheck optional services if they aren’t free.
- Go to your selected hosting company’s website and find the screen to buy hosting. It will not be hard to find.
Normally, you’ll select your level of hosting first.
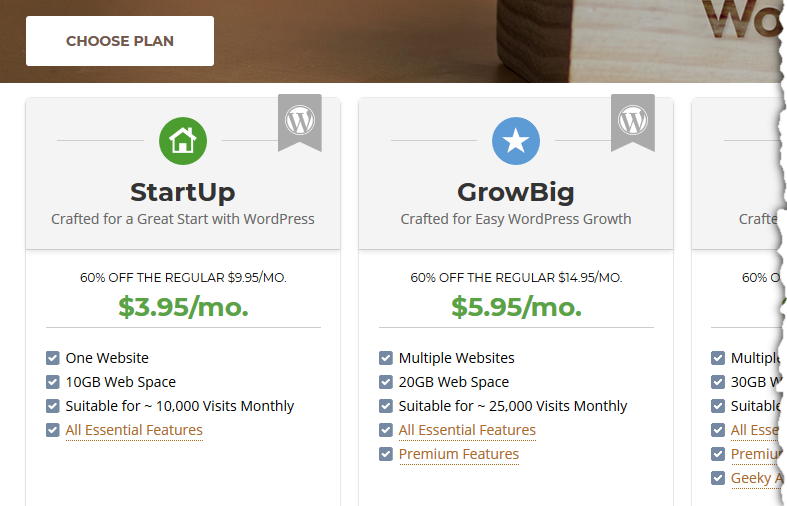
- Select the level of hosting. In this example, the most basic level of service allows one website. If you need more than one website, choose the next level up. You’re unlikely to hit the other limits; if you do, upgrade later.
NOTE: SiteGround offers both “Hosting” and “WordPress Managed Hosting.” These are the same. Other providers may make a similar distinction but charge more for a “Managed” package which includes some bundled services. I recommend the less expensive option.
- You’ll be asked whether you already have a domain, and if not, what domain you want. Answer as appropriate.
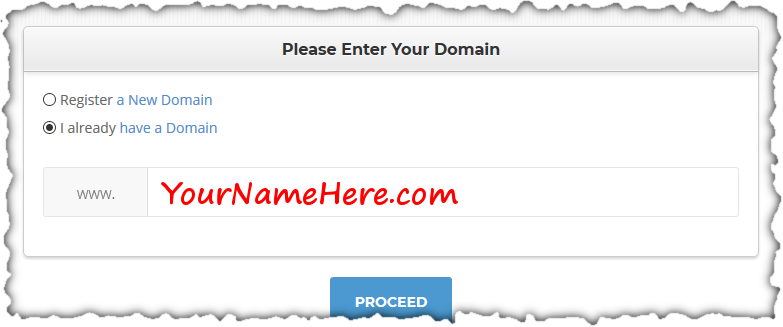
- If registering a new domain, you’ll be offered an exciting opportunity to also buy other, similar domains. I wouldn’t.
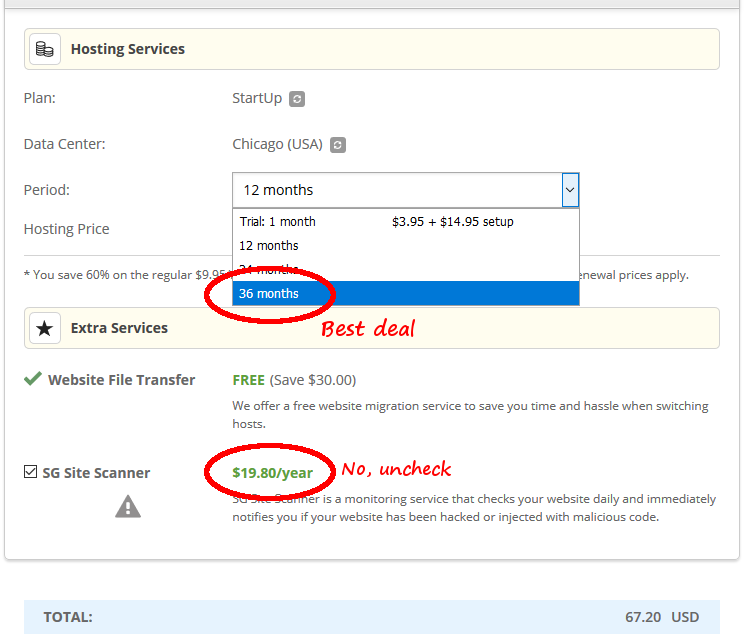
- Select your hosting options. The hosting cost (and maybe a small setup fee) should be your only costs here. If you’re comfortable prepaying for multiple years of hosting, I recommend doing so to get the best price. Getting a refund if you cancel may not be possible, so if you’re concerned about this, please check the hosting provider’s policy.
If there are optional paid services, read about them and decide, but there are free ways to do whatever they want to charge you for, and it’s never too late to add services if you decide you want them later.
- Uncheck site security monitoring.
- If you see an option to install a free SSL or TLS certificate, say yes to that. If not, no worries, we’ll do it later.
Once you complete the order, the hosting provider displays a confirmation screen. They may offer you a way to set up your site immediately, through a wizard, or to install a special WordPress startup package. This is kind of up to you. My step by step instructions assume you start with a plain default setup, so it’s easier to follow my examples if you opt for that. But it’s certainly possible to start with something else and be adaptable. You can get to the destination either way.
- Therefore my suggestion is: Skip additional steps at this time. Press “Complete” or “Continue” – find a way to finish setup without any additional setup being done for you.
If you have to select a type of website to continue, select WordPress (as opposed to Weebly or whatever).
The Site Tools / Control Panel / Manage Website Screen
There’s a page on your hosting provider’s website that has all the controls for your website. After the above setup, you might already be there. It looks something like this:
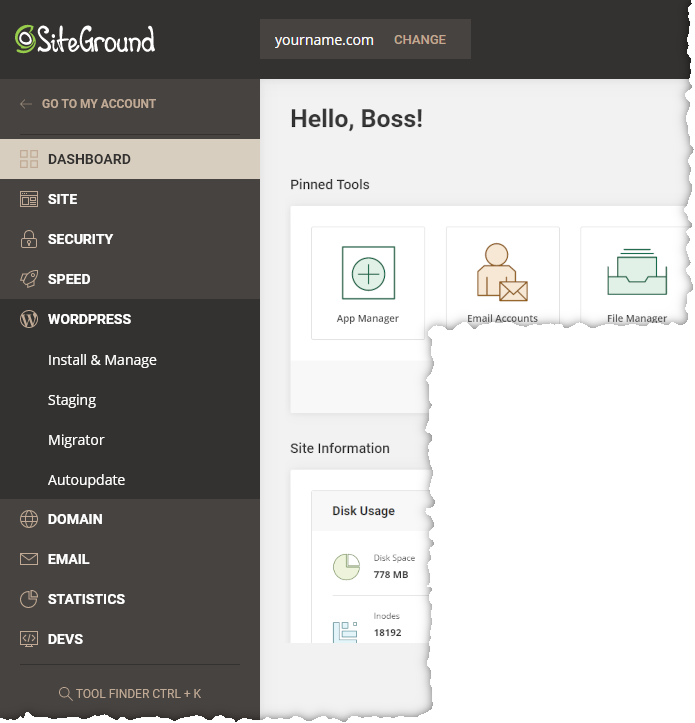
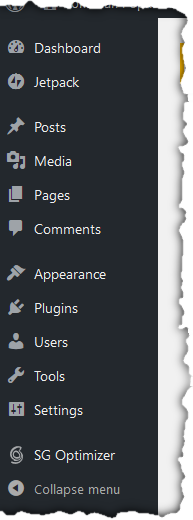
We expect a menu on the left with choices such as Security, Email, Advanced, Site… In this book, I refer to this screen as “Site Tools”, but hosting providers may have different names for it, such as Control Panel, cPanel, Website Settings….
- If you’re not already on the Site Tools screen for your new website, find that screen. Since one account potentially has multiple websites, there should be a screen generally called “Websites” that lists them. On that screen, find your new site and click the button to manage the site. This control might be labeled Site Tools, Manage Site, Control Panel, Setup, etcetera on different hosting providers.
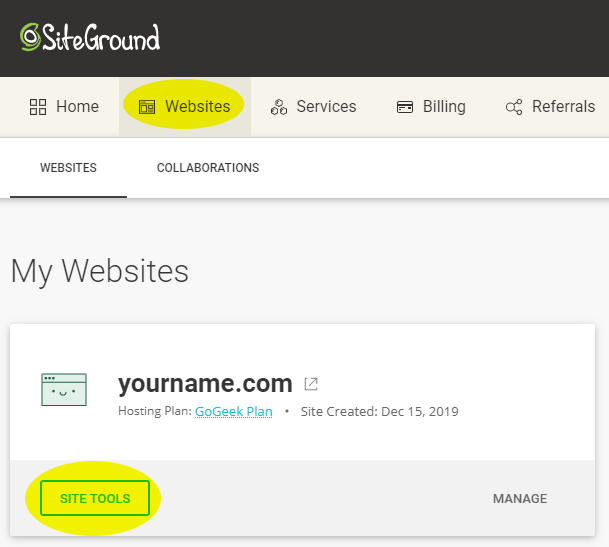
The Site Tools screen is arranged with a menu on the left. This is where you can manage your site, create email accounts, and so on. The details and color scheme may vary, but all my recommended vendors are similar in general organization and what options are available.
Note: On SiteGround’s site, the title “Dashboard” appears on the left, though you clicked “Site Tools” to get here. Your WordPress site also has a screen called Dashboard which looks similar to this one, so that’s confusing. ☹
In this book, I call the hosting provider’s control panel for your domain “Site Tools”. I use “Dashboard” to refer to the WordPress dashboard of your own site, which you’ll see soon.
If Domain is Registered Elsewhere
If you registered your domain with your hosting company, skip to the next section, Install WordPress. If your domain is registered somewhere else, though, you must tell your domain registrar where to find your new website.
You’ll need to know which “name servers” support your site. There are at least two, with names often beginning “ns1” and “ns2”. They might already be displayed on the Site Tools screen of your hosting provider’s website.
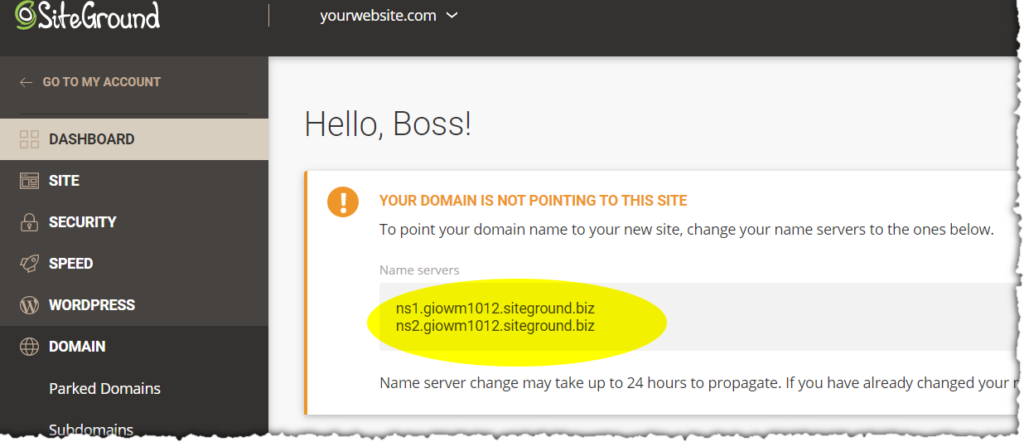
- Find the name servers on this screen.
SiteGround notices you haven’t connected your domain to their servers yet, and displays their names. Other hosting providers may look different but the name servers are generally easy to find. If you don’t see them, look under the “Domains” heading.
- Copy the first server name to the clipboard – in this case ns1.giowm1012.siteground.biz. Leave this window open, because there’ll be more to do here soon.
- Next, in a new browser window, go to your domain registrar, which in this example is Google Domains. Other domain registrars may look different but they all provide a way to do what I’m about to show.
- Go to the screen to manage your domain.

- Look for settings for DNS. Change the Nameservers setting to “Use custom nameservers.”
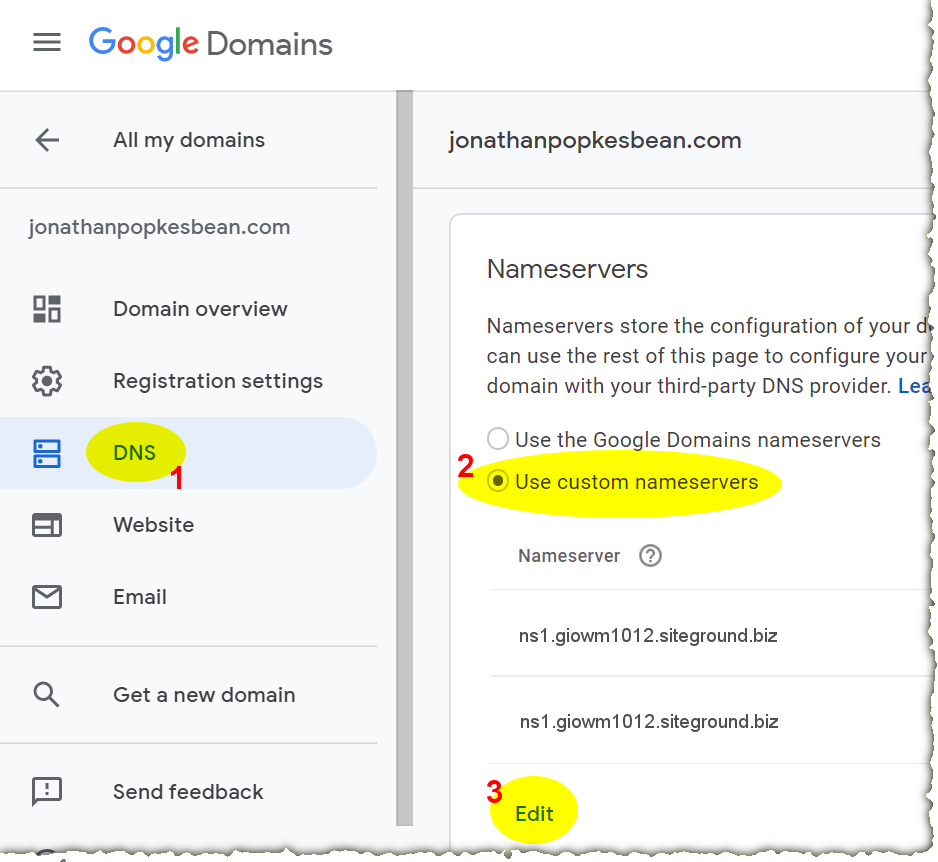
- Paste in the name server DNS names you got from your hosting provider. For Google Domains there’s a separate field for each name server, with a control to add more.
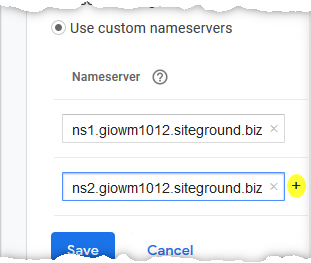
- Save these changes.
After you make this change, there’s a delay before the domain name works for everyone, while the news spreads to other servers worldwide. This is claimed to take up to 48 hours, but in practice I’ve never had to wait more than 2 hours. So:
- Pause your stopwatch and do something else for a few hours.
- Operating systems and browsers cache DNS lookup results, so your browser may continue going to your old server even after the DNS change propagates everywhere. If entering your domain name in a browser isn’t showing your new (probably placeholder) website, restart your computer.
Install WordPress
You have a domain, a hosting account, and the Internet knows how to find you. Now you can start to snap the pieces together to create your new site.
My example website is for mystery writer Jonathan Popkes-Bean, at the domain jonathanpopkesbean.com. Though the writer is imaginary, the site is real, so feel free to poke around there. It’s usually working, except when I’ve taken it down temporarily to demonstrate building it back from the ground up.
If you already installed WordPress as part of the signup process, you can skip to the next section, The WordPress Dashboard.
- Switch back to your hosting provider’s website, and go to the Site Tools screen.
They might offer a way to set up your site automatically through a wizard. Don’t, because I’ve written a tool specifically tailored to author websites, which you can use instead. Do a “vanilla” WordPress setup to quickly get to the point where you can use this tool.
Different hosting providers’ screens vary, but everybody makes it easy to install WordPress from their “Site Tools” screen.
- Look for a control to install WordPress, and click it. If you just see WordPress, but not Install, click WordPress.
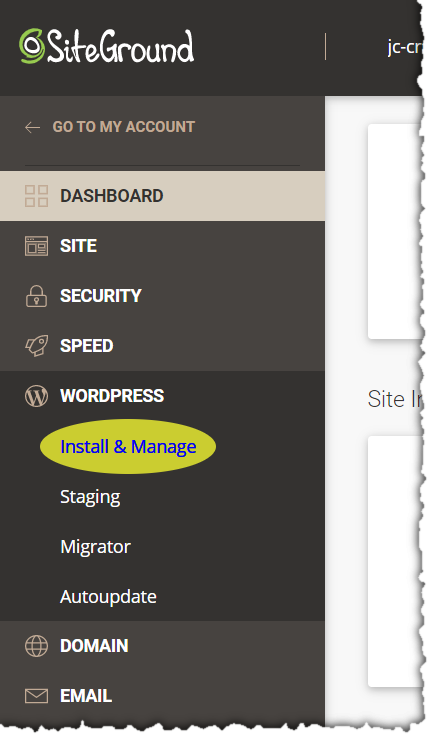
The WordPress installation screen is different with different hosting providers. You might still need to look for an Install button or tab, or look for the option that does a free install as opposed to paying someone to do it for you.
- Choose the free option.
Here’s what to enter in the fields (if you aren’t asked all these things, don’t worry):
- Protocol: If you were able to turn on SSL/TLS during your earlier setup, choose https, else http. If unsure, choose http.
- Domain: yourdomain.com (probably the only choice offered).
- Directory or installation path: leave blank.
- Multisite: Do not enable.
- Site name: Text to appear on the banner of your site, usually your name or pseudonym. You can change this later.
- Site description or tagline: Optionally, a motto to appear below the site name. You can change this later.
- Admin username: Preferably something hackers won’t guess, so not “admin”. No spaces. You cannot easily change this later, but you’re the only one who’ll see it. (Some providers automatically assign a username without asking).
- Admin password: One will be suggested for you. If you change it, choose a good one. Either way, record it in your password manager (or note it down). A real word, or a couple words, or a couple words with some letters replaced by numbers, isn’t secure. Don’t use the same password you used for the hosting service. Some systems may not ask, but instead send you a confirmation email for your initial login, and set your password using the link in that email.
- Admin email: Enter a real email address of yours.
- WordPress starter (SiteGround only): No.
- Any setup wizards, extra non-basic options: No.
- If you have an opportunity to select a theme, do not choose Twenty Twenty-Two, which uses a new and buggy method of customizing your site. Choose literally anything else. I may change this recommendation once it’s no longer “Beta”. (If it sets up Twenty Twenty-Two by default, I’ll show how to change it later).
- Other fields: Do not change.
- Click the button to start the installation.
During and after installation, the hosting provider may try to sell you stuff. Don’t buy. Once you click “Go” on the install, there will be an install progress bar, a wait, and then the installation will be done. Don’t buy anything else. Some hosting providers (yes, I’m looking at you, Bluehost) have been known to fake people out with a progress bar showing not-done when the installation really is done, because they don’t consider it done until you buy more stuff. Don’t buy.
- Look for a button or link to your new website’s “dashboard” or administrative URL. This will be your site’s domain name followed by “/wp-admin”. For instance, http://jonathanpopkesbean.com/wp-admin
- Click the “wp-admin” link to go to your new website (or just type the URL). Login using the ID and password you just created. You can also use your email address as a username.
Some services might instead send you email with an initial login link which requires you to change your password.
The WordPress Dashboard
Your website has its own domain, so it will have its own login, different from your hosting provider. You may have been asked to choose a username and password, or they may have been chosen for you.
Once logged in with your website ID, you’ll be at your website’s WordPress dashboard, the central point for managing your website’s appearance and content.
- Bookmark this page.
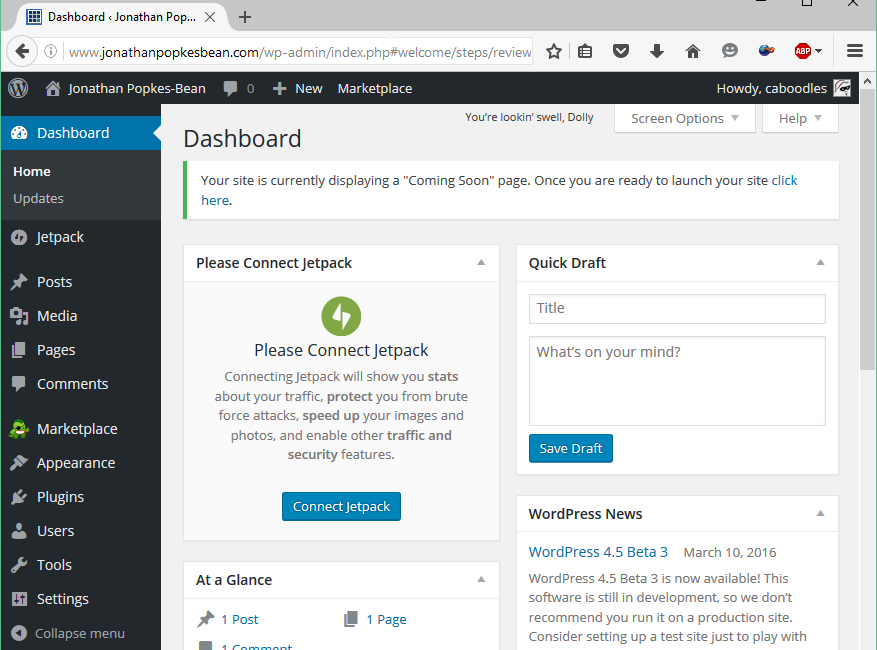
Your WordPress site’s dashboard (details may differ).
So, you have a “site tools” screen on your hosting provider’s website, for installing WordPress, controlling email addresses, domains, and subdomains. And you have a dashboard on your website, for building your website.
The contents of your dashboard vary depending what plugins your hosting company has preinstalled for you.
Let’s explore the parts of the dashboard.
The dark “toolbar” at the top of the screen is always visible while logged in, on regular pages as well as on the dashboard. Visitors to your website will not see the toolbar.

Going from left to right here, there is:
- A WordPress icon that takes you to the “about WordPress” screen of your dashboard.
- A home icon, and the site name, which are a link to the landing page of your site. If you’re on a page of the site, these become a link to the dashboard, so you can always switch between the site and the dashboard easily. It’s also fine to keep them both open in separate windows.
- Other controls alerting you to pending software updates, comments needing moderation, etc.
- A “New” dropdown menu to easily create new web pages, blog posts, and other things.
- On the right is a link to your personal profile as a logged-in website user. It calls me “caboodles” here because I chose that login name during WordPress installation.
Note: If you don’t see the toolbar on your regular webpages after logging in, use the browser’s refresh function and it will appear.
The multi-level menu on the left of the dashboard contains screens of settings, lists of your posts and pages, and other information. If there’s only a column of icons and no words, the last icon (expand/collapse) makes the words visible.
In the biggest part of the dashboard, the part with a light background, you’ll see the contents of whichever screen you navigate to in the menu. You may also see notices from the website code at the top. For instance, this one tells you there’s a newer version of the WordPress software, which you can install by clicking the link.

There may be also be notices from plugins encouraging you to set their options, or to pay to upgrade them to a premium version. For now, ignore those or use the “x” control at their top right corner to dismiss them.
Set Your Profile Preferences
When you write a post, the administrator username you entered during WordPress installation (or that was chosen for you) is displayed as the post author by default. This isn’t necessarily the name you want to show the world.
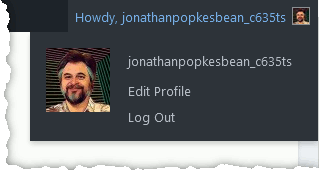
- At the right end of the dark toolbar, click the “Howdy <your username>” link, or hover and click Edit Profile.
This opens your user profile. This screen contains your preferences for how the site will operate for you while you’re logged in. It also has fields for a bio/social media profile, which are optional, and to change your password.
- Scroll down to the Name section. Enter your first and last name, or a “nickname” to display on your posts. Use “Display name publicly as” to select one of these names.
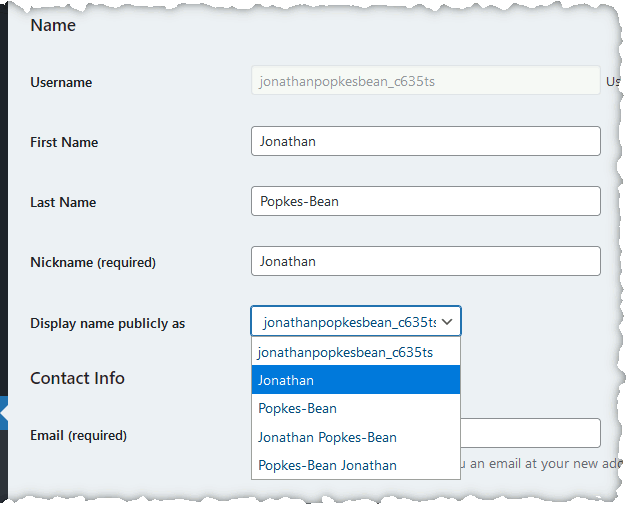
- Scroll to the end and click Update Profile. The name should change on your toolbar.
The system will use the selected name to identify you as a post author.
Confirm Settings
- In your dashboard, navigate to Settings > General. Confirm the values in these fields:
- Site Title (which appears as the browser window title and usually on the banner of your site)
- Tagline (which often appears on the banner below the title)
- Administration Email Address for the site to use to send you notifications (for instance if a comment requires moderation).
- Timezone controls how the website displays and interprets times. For instance, if there’s a timestamp on a post, or if you create a post to auto-publish at 6 AM, in which time zone do you mean? The setting need not correspond to your actual geography.
Correct anything that’s wrong and click Save Changes.
Often, you will have entered the title and tagline when installing WordPress. However, some installers don’t ask for this information; they fill in a default title like “Just another WordPress site” and expect you to change it later. Later is now.
Does your theme allow customization via “Customize”?
The WordPress “theme” controls the layout and look of your site. You can customize this appearance through options and by adding “widgets” with content that automatically appears on every page.
There are two very different scenarios for customization of your site. Most themes use the old-fashioned way, “Customize”. Other themes use a new “full site editor” paradigm, which is a bit buggy and is missing some important abilities. Once it matures from its current “beta test” status, I’ll probably recommend people use it, but not today. Today, the bleeding edge will cut you.
To determine which technique your current theme uses:
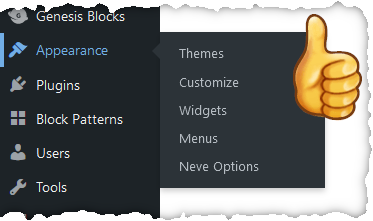
- Hover or click the Appearance menu in the dashboard.
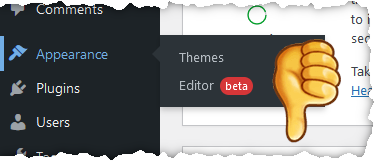
We want to see “Customize” as a selection, not “Editor”. If it’s wrong, we’ll fix it, next section.
Select a temporary theme to follow along these examples
Because I use it in my examples, I suggest you select the theme Twenty Sixteen to make it easy to follow along. You will probably switch it to something more modern later, but it’s a good one to learn on. In any case, you must use a theme that lets you use the Customize function, as shown above, or few of my examples will resemble what you see.
- In the dashboard, use menu Appearance > Themes.
- Click Add New and search for Twenty Sixteen.
- Click Install on Twenty Sixteen (assuming it’s not already installed).
- Click Activate on Twenty Sixteen.
Run the “Torknado Author” Setup Plugin
- Download this file to your computer:
- In your WordPress dashboard, go to Plugins > Add New.
- Click the Upload Plugin button near the upper left.
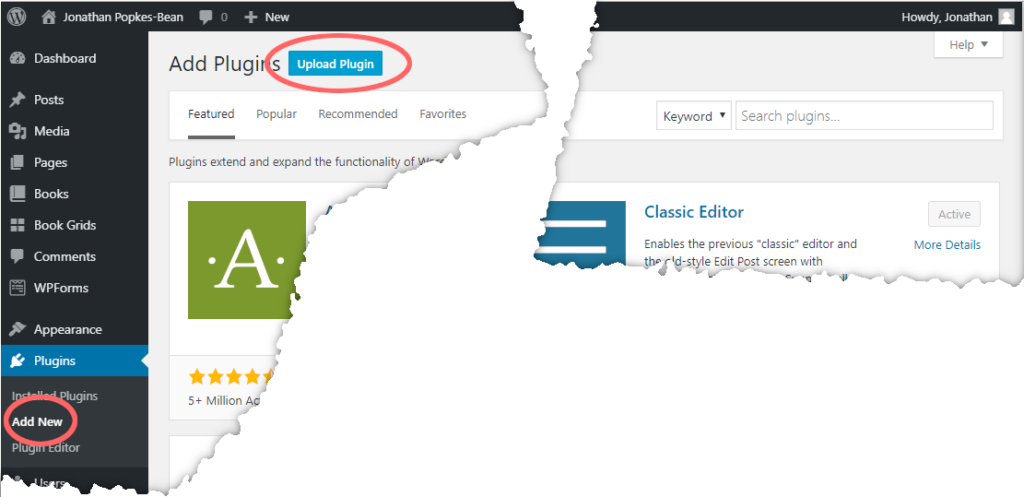
- Select the zip file you just downloaded. If your browser didn’t ask you where to save the file when you downloaded it, it’s probably in your Downloads folder.
- Click Install Now.This will unzip the file and add it to your list of installed plugins.
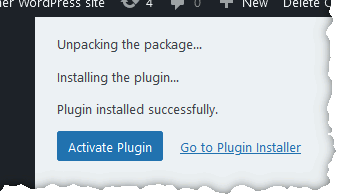
- Click Activate Plugin to let the new code run.
This brings you to the Author Website setup screen, with additional instructions. The first will be to install some additional plugins, which takes a few mouse clicks.
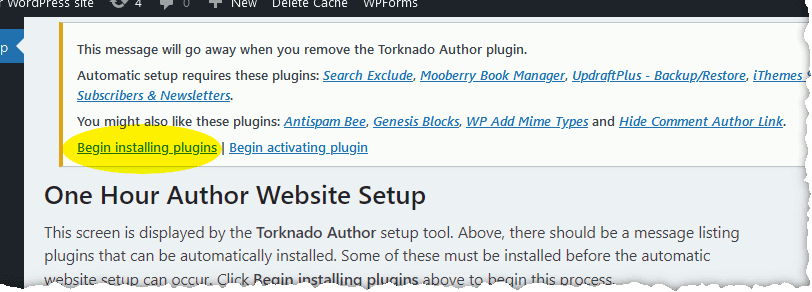
- Click the Begin installing plugins link to open the plugin install screen.
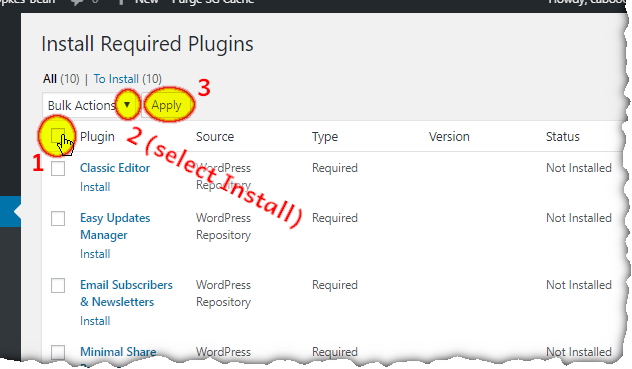
- Review the list of plugins I’m having you install.
The Type column shows which are required for the setup tool to work, and which are merely recommended depending on your situation. There’s a short description of what each plugin does.
- Check the box at the top of the checkbox column to select all the plugins.
- Deselect any Recommended plugins you don’t want to install at this time.
- Use the “Bulk Action” dropdown to select Install, then click Apply.
This will take a few seconds to complete, then everything will be installed. There will likely be notices at the top of the dashboard from some of the newly activated plugins. Some plugins might take over the whole screen.
- Dismiss or ignore these plugin notices for now. Look for a way to return to the dashboard.
- Use the dashboard menu Author Site Setup to return to the “One Hour Author Setup” screen and follow whatever instructions you find there to complete setup.
You should get a results screen listing what changes the setup button made. Some parts of the setup can’t be completed unless your theme has certain features. If that happens, there’s a notice in the setup results screen. For now, just take note.
Later chapters cover these in detail for you to decide whether to change themes, get a plugin to do that part, or just not do it.
This tool creates webpages and menus for your site, and sets things to appear in the website’s widget areas. It sets options on several settings screens, and creates sample contents on the pages.
Once you’ve run the setup, and if it seems to have worked…
- Go to Plugins and click the Deactivate link on Torknado Author Site.
If you want to run the tool again later, reactivate it from the Plugins screen.
Test Your Website
- Click the “home” link on the dark toolbar to go to your newly configured website.
- Visit each page in the menu and note the contents.
- Use the contact form to send yourself email. Check that the email arrives within a few minutes.
Email Sending Configuration
You can skip this step for now if your website’s ability to send email seems to be working – for instance, if you received email sent via your Contact form. However, you’ll almost certainly need to do it eventually.
Your website needs to be able to send the occasional email. At a minimum, it sends them to you, the site administrator, to notify you of plugins that were automatically updated and comments needing moderation. It uses email to send you a password reset if you lose your password, and to send you messages people entered on your website’s contact form. If you set up email newsletters and automatic blog notifications for your mailing list subscribers, that’s a lot of other email going out to people other than you.
As configured by default, your website can send email. But these messages are sent in an old-fashioned way that doesn’t meet the modern standard of authentication. When they arrive at their destination, they show up with no ID and are likely to be turned away at the border as likely spam or “spoofed” email.
Not every email system has border guards this strict, but given the absolute glut of spam and scam emails clogging up the Internet, it’s a safe bet that more and more of them will be. Even if you can receive email from your website now, that might change at any time, and there are definitely other people who cannot.
So my setup program installed a plugin to give your website’s outgoing email a proper passport to make it more likely that it’ll be accepted at the destination. To make it work, you must fill in a form. Your web server will send email by passing it to a “proper” mail server that knows how to issue convincing ID.
To make this work, you must have access to an email account. Technically, you can use any email accounts, including your existing personal email. But generally, I suggest people create a new email account in their own domain which is used only for website-generated email. A few reasons for this:
- If your website should get hacked, the hackers don’t also get the password to your personal email.
- Recipients can’t find your personal email address in the “technical” information of the email.
- If you change your email password later, you have to remember to change it here also or your website will stop sending email and you might not notice for some time.
Create Special Account for Email Sending
Assuming you’re taking my advice to make a special email address just for your website, where do you create it? You might be tempted to use a free service such as Gmail, and that is possible. But generally, I prefer to set something up in my own domain, e.g. noreply@yourname.com. All the hosting providers I recommend provide the ability to create multiple email accounts in your domain. With some you might end up paying a little extra, but I feel it’s worth it to be able to have a personal email address in your domain for business use – it looks more professional.
If your domain’s email accounts are hosted through G Suite or other outside provider, you must create the throwaway account there, not through your web hosting provider.
So, assuming you have the ability to create email accounts in your website hosting account, login to your hosting provider and go to the Site Tools screen – remember that? The one where you installed WordPress from.
- In the Site Tools screen, look for Mail in the menu.
Somewhere in there is a screen that will show you the email accounts they are hosting for you, and let you create new ones. Here’s an example from DreamHost:
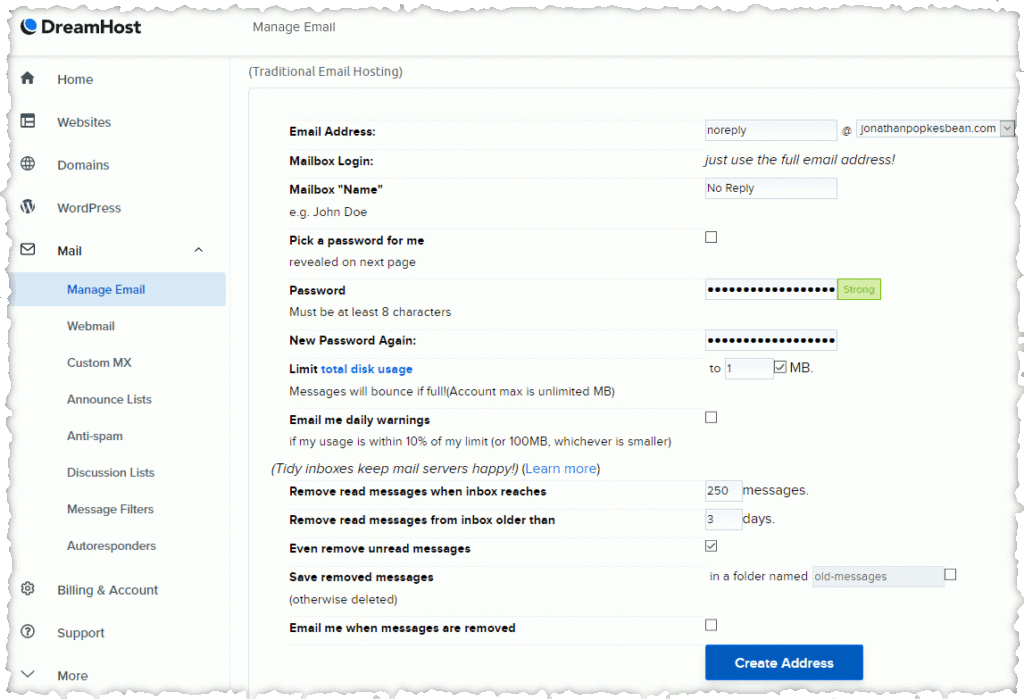
The text in that might be too tiny to see, but I’ve asked to create an account called “noreply@jonathanpopkesbean.com”, and given it a low quota so it doesn’t accumulate junk indefinitely and use up space. I also filled in other fields to tell the system to discard all incoming email after a short time and not send any automatic notices when the mailbox is full. But that’s gravy – just setting a low quota is enough. Some systems don’t let you adjust the quota until after you create the account, so don’t waste a lot of time looking for that before clicking the Go button.
- Create an email account called “noreply” and set it up as described above.
Note: Some systems let you set up a “garbage” address that discards all incoming email. This isn’t what you want. Garbage accounts can’t send email, so they’re no use for this.
The email address and password you select here are part of the information you’ll use to configure the mail sending plugin.
Configure the WP SMTP Mail Plugin
- Once you’ve decided which email account to use for sending, visit Plugins in your website’s dashboard and activate the WP Mail SMTP plugin.
It’s likely to immediately take over the screen and offer to prompt you through setup. If not…
- Go to WP Mail SMTP > Settings and fill in the form.
Both ways will ask you the same questions, and here are the ones you might need to change:
- License key: leave blank.
- From email: noreply@yourdomain.com.
- Force From Email: check.
- Return Path: Check “Set the return-path to match the From Email.”
- Mailer: If you created the sending email account in your own domain using Site Tools, or if using a different email account whose provider isn’t listed, select Other SMTP
From this point, you’ll have different fields depending what you selected for Mailer. If you selected Other SMTP, you’ll need to enter the correct values for your mail server. Your email provider should be able to supply the values for SMTP host, port numbers, and so on.
If you used one of my recommended hosting providers, refer to the webpage https://torknado.com/email-auth for specific information about those hosting companies’ settings. If using a different provider, the information should be easy to obtain from their website. It’s the same information needed to set up an “email client” such as Thunderbird on your PC.
- Enter all this information, click Save Settings.
Test SMTP Settings
- In the WP Mail SMTP > Settings screen, scroll to the top of the page and click Email Test. Send yourself a test email to make sure it’s all working properly.
If not, confirm all the information in the settings fields, maybe try something different if there were any you were unsure of, and failing all else, contact technical support at the email provider (heaven help you if it’s Google – this is one reason I prefer to use the hosting company’s email).
If you have to guess about any settings: you will definitely need to supply a username and password, and it’s very unlikely that “none” will work as an encryption setting.
If you can’t get it working and need to come back to it later, go to the Plugins screen and deactivate the WP Mail SMTP plugin. That will restore the default mail sending mechanism.
Basic Setup Complete
The functional setup of your website – the “one hour” part — is complete.
From here on, it’s up to you to personalize the site with content (about yourself, your books, blog entries), select an alternate theme with a look you like, and personalize it with colors and graphics. The next sections show how to do this.
There are also functions you’ll probably want to add. For instance, the site lets people subscribe to your blog and/or newsletters, but if you want to use that mailing list to send automatic blog updates and other email, there’s additional setup.
- Now that email sending is hopefully working, visit your site and subscribe to your own email alerts, if you didn’t already do that.
There’s an extra menu item, “Styling Test”, for evaluating themes. The styling test page contains examples of paragraphs, lists, block quotes, and images, so you can see how those appear in different themes you try out. Later you can remove it.
NOTE: Depending which theme your hosting provider uses by default, your “sidebar” may appear below your main content instead of to the side, or might not appear at all. Using a different theme will put it in a different place.
