When you upload an image to your WordPress media library, WordPress automatically creates copies of the image at different scalings. The basic WordPress engine generates some of these, the theme may create others for its own purposes, and even some plugins may arrogantly jump in and add theirs. You can’t see all these extra files from the Media Library screen, and they can pointlessly use up disk space. You can use your website host’s File Manager screen to see them in your server’s file system, as shown here where one upload resulted in 16 total image files in different sizes.
The file with “-scaled” in the name is particularly notable because it’s the largest size you can actually use on the site, and its maximum dimensions are 2560 pixels. Normally this is fine, but if your site is about professional photography, let’s say, you might like the option to use the exact image you uploaded, regardless of size.
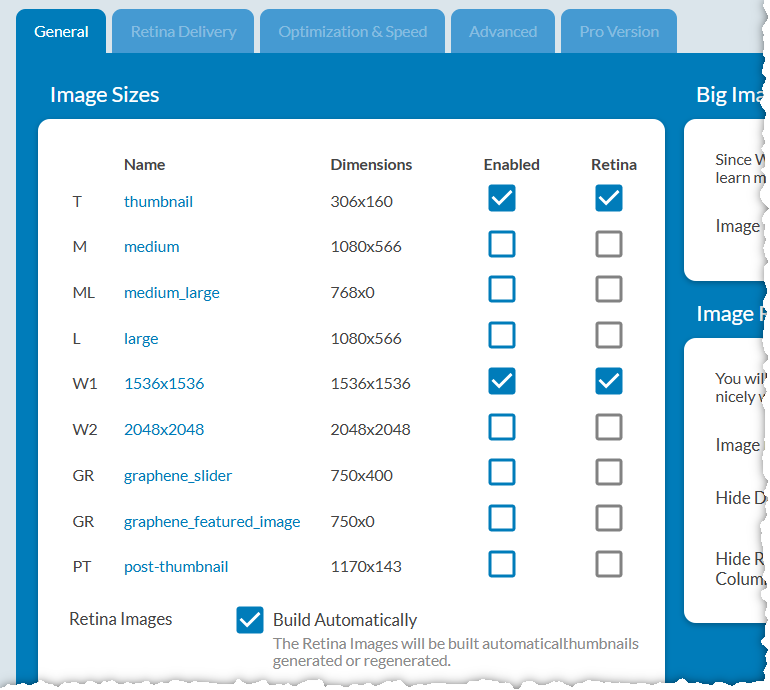
To control these factors, I recommend the plugin Perfect Images (Manage Image Sizes, Thumbnails, Replace, Retina) by Jordy Meow.
Note
Some of these files are created based on your choices in the Settings > Media screen of the dashboard. There you can select dimensions for Thumbnail, Medium, and Large sizes. You can disable these by entering 0 (zero) for the width and length. The others, there is often no field to control whether they’re created and how large they should be.
If you find this website helpful, subscribe for email updates!
Your information will not be shared (except with MailChimp, who manages the subscriber list).
There’s a good reason to have several different sizes pre-calculated, even just to embed the image one time in a post. Different website visitors have different sized screens, so they may view the same image at very different “zoom factors.” If there’s a list of different sizes to choose from, the web browser can choose the smallest file that will look sharp on that display. This improves your site’s performance.
If you use your web browser’s developer tools to examine the HTML of an image in a WordPress page, you’ll probably see a list of various sizes in the code:
<img loading="lazy" class="size-full wp-image-374" src="https://.../lots-of-scaled-copies.png" alt="Screeenshot from File Manager" srcset="https://.../lots-of-scaled-copies.png 404w, https://.../lots-of-scaled-copies-251x300.png 251w, https://.../lots-of-scaled-copies-125x150.png 125w" sizes="(max-width: 404px) 100vw, 404px" width="404" height="483">
The “srcset” parameter of the “img” element lists the URLs of multiple images and their widths, so the browser can choose. You can examine the HTML like this to learn which sizes are actually being used in a given context.

This plugin has a dashboard that, among other things, lets you select what image sizes to produce. It has several other useful functions, including the ability to enable creation of larger-size “retina” images to give a sharper image on higher-resolution displays (based on my testing, the retina functions seem to do something useful only in their “pro” version). Please do read their tutorial.The settings shown above are extreme — they’re for a website where all the images are used in a specific limited way and where the availability of middle-resolution images was causing a problem. You probably will want more size options than the three enabled here (the two checked plus the original full-size image), but you probably don’t need every size your website is currently generating.
If you do uncheck some sizes here, the plugin also has the ability to select images already in your media library and regenerate the scaled sizes — deleting the ones you didn’t want. If you later decide you need a size you disabled, you can enable it and use the regenerate function to create the missing sizes for all images already in your library. This function is slightly hidden — to find it, go to Meow Apps > Settings in your dashboard, and look on the upper right for the Dashboard button.